There are dozens of survival skills you can learn from camping, and it is great for boosting self-confidence in yourself. Most importantly for survival, camping helps you get used to being outdoors and comfortable in nature and what resources are provided for you to survive there. So get out there, go camping to learn an outdoor living. How do you catch a fish, build fire, How do you build a shelter with natural resources?
When a person is in an outdoor Survival situation, the 1st priority is to find a shelter that prevents exposure to elements like cold or rain that could be dangerous, thankfully, everything needed to build a Survival Structure is naturally found & available there to build various types using no tools.
Being aware of your surroundings is very important. You need to get the shelter up before things start to change like weather or how much sunlight is available. So stay simple but busy and be aware of those changes around you.
How to Build a Shelter In the Woods
In the list of priorities of what to do in a survival situation lost in the woods, mountains, or desert region:
- Shelter
- Water
- Food
No matter if your kids are Boy Scouts or Military they should know survival skills whether it happens or never happens. It seems like the more generations that go by the fewer that are able to turn a screwdriver. Man, I think I’m turning into my old Man! That’s what he would say but he was right. The basic necessities in life are what you need for getting through a tough situation and may be the difference between living or dying to elements.
A shelter is the first priority that a person finds him/herself that needs to be provided for simple reasons. First, access your needs and most likely it will be sheltered. How much time do you have? How cold is it? How big it should be?
A Shelter needs to be:
- Dry
- Flat
- Not right next to a body of water.
- Not underneath any cliffs, falling rocks, or dead limbs that could fall on you
- Is readily visible or very well hidden (depending on whether you want to be found or not)
- A space for a fire
Choosing a flat site for your shelter is not just for comfort! If your shelter is on a slope and it starts raining, then the rainwater can come into your shelter. If you are unable to find a flat spot for building your shelter and rain is likely, then you will need to dig trenches to divert the water away from the shelter.
Decides what type of shelter you can manage with the material that’s in the area or any kind of tools that you. brought with you. You need to make a decision and can’t wait too long to make it. People that are hiking or lost somewhere don’t have the necessary equipment to be able to set up camp for one night rather than a few nights.
My son who hiked the Appalachian trail at the end of this summer approximately 400 miles prepared himself physically and equipped himself with the best hiking clothing, lighting, tents solar, and rechargeable camping supplies, and still wasn’t 100 % ready for what he encountered.
He did well but there are so many obstacles that even the most professional outdoorsman encounter outside that you can never take anything for granted or you will be taken by surprise. Dangerous obstacles can present themself.
Debris Shelter
The simplest and fastest way to build a Survival Shelter is one that is warm and dependable and dry and you don’t even have to worry about a fireplace at first because of its natural ability to use your own body’s heat to keep the shelter warm. As long as the shelter is dry and keeps the wind off you you’ll be amazed at how comfortable you can stay warm.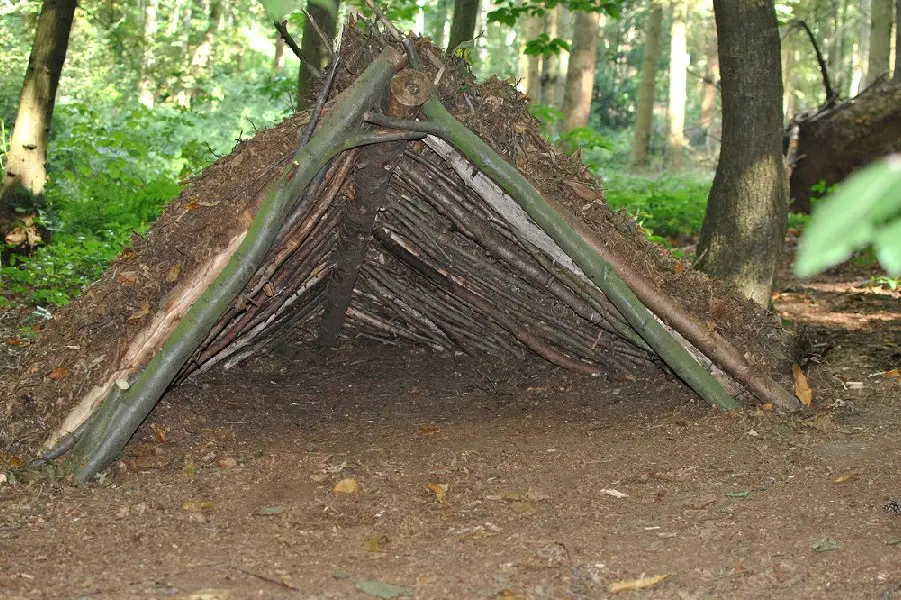
- Before you start use a jacket or a shirt to act as a way to fill the scraping of debris from the woods to carry to the Shelter
- Use your hands to scrape and grab anything laying on the wood’s floor particular grasses, leaves, and vines fill your jacket or shirt and carry them over to where the shelter pile will be
- Pile it up next to where the Shelter will be-the reason is if it starts to rain or get dark you can burrow into the pile and use the pile until the next day you have more time. (the more debris the warmer it will be)
- While collecting leaves and grasses pick up sticks a finger or wrist-thick that will rib the shelter for supports
- Pile the sticks and loose leaves and weeds in separate piles
- Find a center pole for your structure the Ridge Pole that is approximately the length of your body and about wrist-thick that will be strong enough
- Find another one that your height plus one arm held straight up over your head
- Find 2 more around 4 ft. height with a fork on the top of each
- Set the ridge pole into the 2 forks shaped like a triangle on one side and lay the other side of the ridge pole on the ground. This will cover the length of your body
- Use the sticks to lay on each side of the frame like ribs vertically from the ground leaning on the ridge pole along with the structure.
- Then lay some more sticks like lattices horizontally woven between the vertical sticks making a skeleton-looking building
- Start laying the leaves and debris inside the sticks covering and filling the holes
Spider Shelter
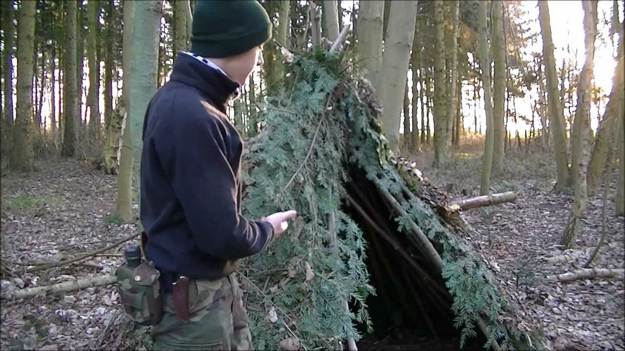 Start with making the mainframe from 4-6 foot sticks that will act as the framing for the structure four sticks about 2 or 3 inches thick. Join all 4 sticks at one end and the other end at a 45-degree angle into the ground.
The Spyder Shelter is a similar type of Debris Shelter where you use a shirt or jacket to collect leaves and sticks to drag them back to an area close to where you can make the structure.
This type of shelter can be more spacious. It uses more posts on its framework, providing more space for your survival gear and equipment. Building a spider shelter is just as easy as building a debris shelter. Just making the framing wood longer and using more of them will add to the weight and warmth of the building
Pine branches mixed with dead leaves will do the trick along with waterproofing the Structure. Using swaths of a pine tree from my experience works easier and can hold in place for longer periods of time. The Spider Shelter, I think is easier to assemble but you still need the collect the debris from the floor of the woods.
It’s just put together a little bit differently so the weight is not all on the top of the building but rather is hanging from the sides like a tee-pee style shaped arrangement.
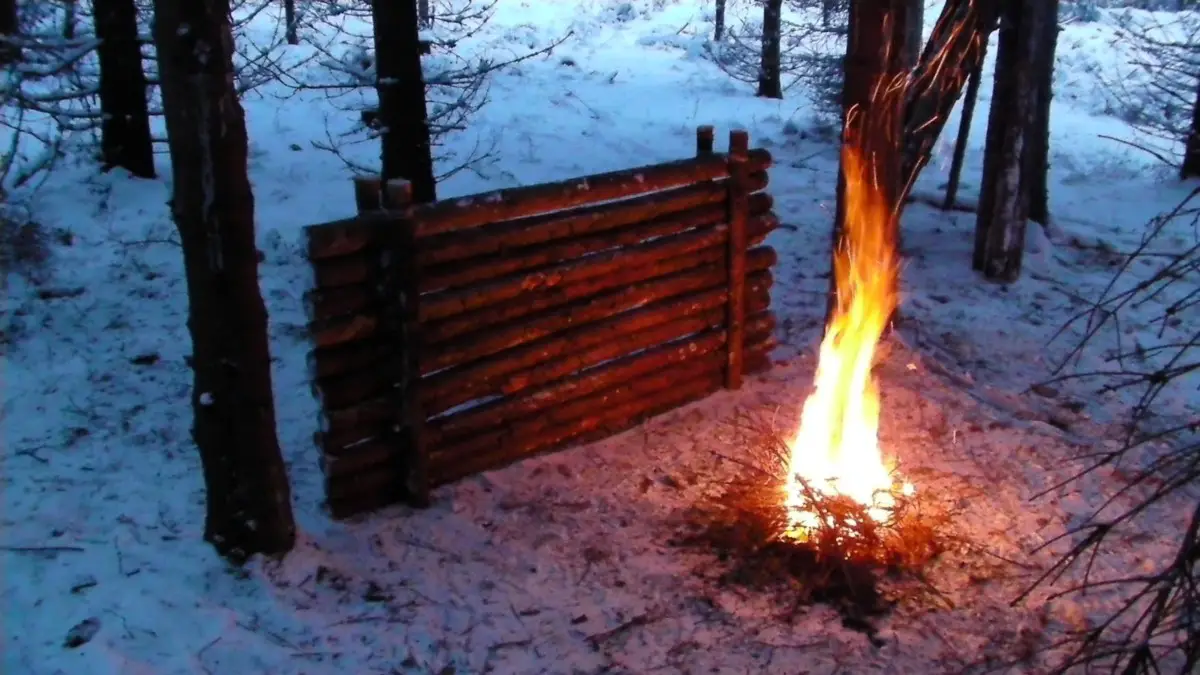
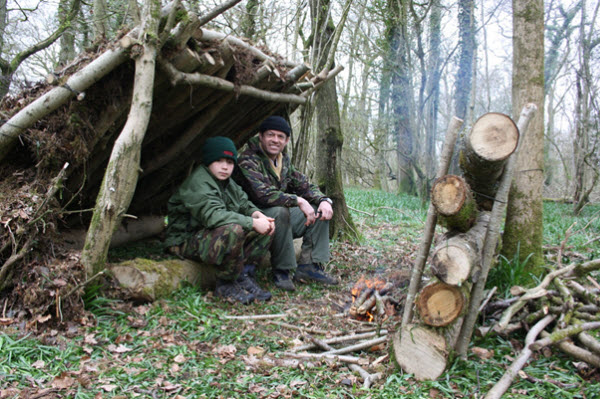
Winter Survival Shelter With Fireplace
 A great way of topping off one of these Survival Shelters in the winter is to add some heat. With a Debris Shelter as mentioned earlier, you can make them smaller and more insulated adding your own body’s heat to create enough warmth to get you through. A better way is to create a fireplace outside the structure and add a Survival Structure Firescreen to block the heat to go back into the opening or entrance to your Debris or Spider Shelter.
A tarp or poncho is worth its weight in gold in a survival situation. You have to stay dry or risk the danger of hypothermia. No matter how well insulated your clothes or sleeping bag may be, if they get wet they will lose their insulation properties and you’re in for a cold long night. You can keep smoke levels low by using dry wood or smokeless fuels, but if using a survival shelter these may not be an option, so you may be collecting wood that is damp. It will produce a lot of smoke.
If you build the shelter down into a hill you can cover the structure with snow that will create even more insulation. Make a campfire outside the entrance and add a fire screen that can deflect the heat from the fire back to the entrance of the structure. If done right, this will warm you while building it and once lit, will provide you with around 6-8 hrs of warm fire without the need to care a lot about the fire and without too much smoke.
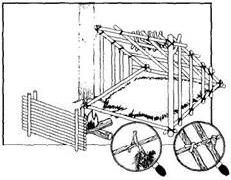
The Lean-To Shelter
 A Lean-To Shelter is one of the most popular shelters in any survival documentation. It is an uncomplicated shelter to build and if you have a tarp, mylar blanket (emergency blanket), or poncho, it should only take
 a few minutes. Whether making a more permanent wooden lean-to or a quick emergency shelter, the lean-to will protect you from environmental threats. One of the reasons a lean-to is so popular is you can build it out of almost anything. Materials such as trash bags, tarp, poncho, or plastic sheets can be used to waterproof the shelter. In the following link, we discuss building shelters using tarps, ponchos, and emergency blankets.
Another reason is it’s simple to get a fire inside keep timber you use for a frame at a 45-degree angle and if you come across a stone face from a boulder or side a mountain you can use that as the face of the shelter.
Any kind of wood can be used for a reflecting wall. Use green logs if can the extra moisture of live wood will limit its flammability. If you’d like the wall to double as a firewood drying rack, you can build it from dead wood that is wet. Also, any bigger stones in the area will work well as sides to block the wind from the sides and absorb heat from the fire
JimGalloway Author/Editor

References: Field and Stream