Introduction:
The old stone house that I was renovating and planning to move into, was built from a barn on a Pennsylvania property originally deeded in 1696. The north side of this building was built into the ground and when it rained heavily, the groundwater came in at floor level inside. The heavier it rained, the bigger the wave of water that ran through the building that would be my home.
Solution: We put together a successful plan with the help of a Construction Contractor, who was a good friend of mine. This was what we came up with.
- Exposed the outside of the wall – The dirt and fill used to originally back-fill against the wall need to come out. Along with the old field tile or any drainage pipe that was being used, it has to be removed down past the footer.
- Clean the dirt and debris from the wall- The caked-up dirt on the house has to be cleared away so that the next couple of steps will work better. Broom or brush the wall cleaned and then with a power washer finish it off.
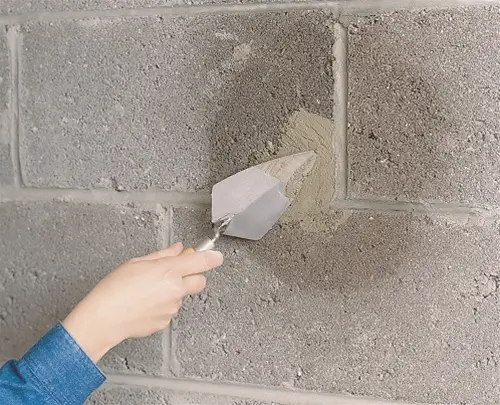
- Plug any holes or cracks with Hydraulic cement after the wall is clean. Use hydraulic Cement to plug any holes or large cracks in the wall. Follow directions for the cement and clean out loose stones or cement before applying this product.
- Paint the Outside Wall with a Cement Waterproofing Sealer- After the wall dries brush on a waterproof paint-sealer used for outside walls. This needs to be dried thoroughly.
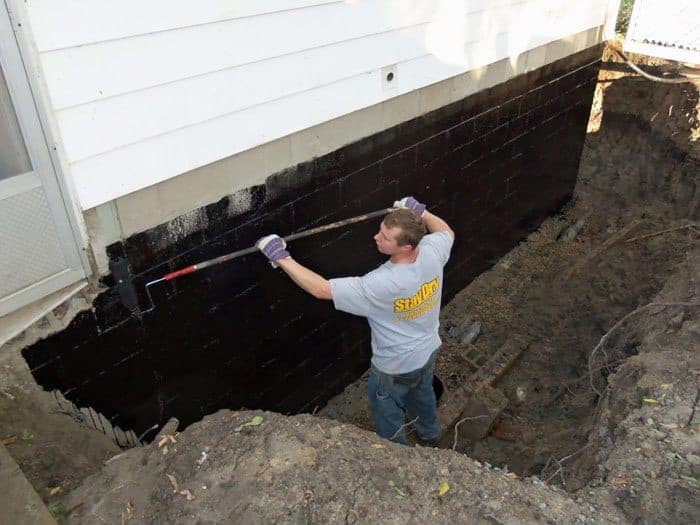
- Pitch the Wall with a Tar-based product- Use a Tar-based Pitch and trowel the product onto the wall.
- Add a Thick Heavy Duty Membrane 6 Mil or Above– Roll out a thick plastic Heavy Duty plastic or rubber Membrane and lay it up on the wall with some help on the pitch over the footer and apron it outwards away from the wall.
- Add a few inches of 3/4 inch gravel base for the Drainage Pipe to lay on in the trench below the Footer. A base of gravel in the trench is needed to support the plastic perforated drain pipe.
- Lay Perforated Drainage Pipe-Cover with Gravel- At about or near the footer level with the holes face down. Then back-fill gravel and cover the pipe with at least a 3-4 inch cover.
- Cover the perforated plastic pipe with a Fabric Barrier– This is an important step to ensure that dirt doesn’t get back into the pipe and clog the system
- Back Fill Dirt-Back-fill the dirt back into the trench and build the top of the dirt high enough to allow for settling. Try and slope the ground away from the house to allow for the runoff. Adjust the rain gutters to move water from the roof away from the house.
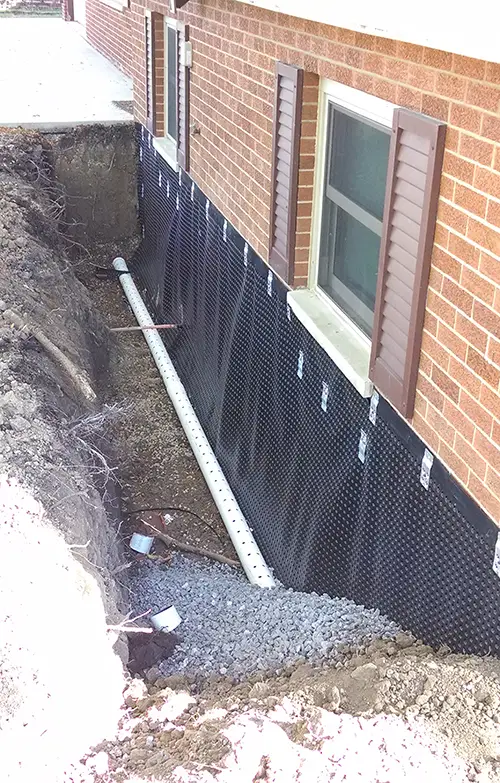
Lay your Drainpipe (holes down) on a bed of gravel-cover the pipe with a sock and cover it with gravel
Waterproofing Exterior Wall Products
The cost of the project would depend on a few extra options that would include a Bobcat or a Trencher. This could cost up to 200 to 300 dollars a day more, plus the delivery cost. Because of the proximity of the trench against the wall, a Bobcat, Trencher, or Mini-Excavation equipment would be hard to operate. Especially if you don’t normally operate this kind of equipment. We found that the best way was the old-fashioned way. Get in there and dig by hand.
Afterward, about a month later, and after the ground settled, I rented a small Bobcat to landscape the trench against the wall adding fresh topsoil and a few bushes. Now you would hardly know that anything happened there.
The cost of this job without the Excavator or Bob Cat was approximately: 1000.00 dollars but it would depend on the size of the wall that you are waterproofing. If you dig by hand and assume that your shovels, post hole diggers, and wheel barrels, then the materials needed are:
- Waterproofing Paint Sealer
(Thoro-seal which is a cement-based paint that has been around for years) is 50.00 dollars for 5 gallons. There are newer products at 250.00 dollars for a 5-gallon bucket. Newer technology products like Krystol T2 are surface-applied water block that prevents hydrostatic pressure. The product grows microscopic crystals that fill the pores and voids in concrete. It can replace faulty membranes and give years of added protection. This amount will normally cover up to 300 square feet of a wall. It can be sprayed or painted on.
- Plastic Heavy Duty Membrane
6 mil and over is under $50.00 for a 10x 50-foot roll or about 500 square feet. You can double it up for better protection
- 4.75 Gallons of Tar Pitch like Henry
Their products are designed for above and below-grade outside walls and will provide about 100 square feet of coverage for around 50.00 dollars. This product is meant to be applied on all masonry walls including cinder block and concrete.
- Trowels and brushes for the application
of these products would be approximately between $50- 75 dollars. They are necessary to apply the products on these types of surfaces.
- Hydraulic Cement
can block running water in cracked concrete and block other masonry surfaces. Hydraulic Cement is Good for above or below grade and sets in 3-5 minutes at 5500 lbs. PSI. Can fix golf ball size holes in your wall. It can harden and set underwater and is what you need to patch any holes or cracks before painting it.
- Bulk 3/4 inch
is around 30-40 dollars a ton and approximately $100.00 for delivery. Have the truck deliver it during the week. It will be cheaper than the weekend rate. If you try and pick it up yourself, it will just use up too much time and might mess up somebody’s pickup.
- 4″ Polypropylene Drain Pipe
with socks is about 25.00 dollars a length no need to add the fabric barrier with the added sock. This size pipe is the normal size for drainage. Make sure to use some kind of barrier.
- Pressure Washer
Most places like Home Depot run about $100.00 per/day or buy one. A pressure Washer has all kinds of uses. Besides the wall, there are a hundred uses for one. We had a built-in pool and decided to buy one and it was a great investment. By the time you add the cost of renting one every year, you’ll see what I saw it makes sense to buy one. Generac has many gas-powered ones that work great you can find them on Amazon. Check here for an updated price. Generac 7901 – 3100 PSI Gas-Powered Pressure Washer with PowerDial Gun

Lay your Drainpipe on a bed of gravel cover the pipe with a sock and cover it with gravel. Square Foot is generally Length x Height. So an 8-foot wall 30-foot length is approx. 240 square feet. these products give you pretty much exactly what you need to perform the task.
How to waterproof foundation walls from the outside
“If you have food and beer they will come”
We planned the project on a Fall weekend with good dry weather and we were blessed with it. We also decided to give the whole project a party-type of atmosphere. I found that good friends will work hard if they eat and drink well.
My wife and I knew that this job would require a lot of back to dig the trench. So we scheduled a weekend or 2 days and invited over as many friends as we could. My wife made huge amounts of breakfast for everyone so no one had an empty stomach. We started early.
The wall was about 30 feet long and we needed to get down past the footer which was almost 8 feet deep. Working in shifts, we found it incredible how fast we were able to dig the trench. It was almost fun with lots of music playing and snacks that my wife was serving up.
By dinner time we were cleaning the wall. Dinner was a huge barbecue and keg of beer that was strategically brought out after the blunt of work was done. By nightfall, I and a few others were patching and painting the completely exposed wall.
Add Hydraulic Plug Inside and Outside Walls
By the next morning, I could get in close and inspect everything and the wall was looking good. We started the pitch which was pretty messy like I anticipated and troweled it into the wall making a coat over the freshly dried sealer paint.
A few of us laid out a plastic sheet that was doubled up and laid it up against the wall that was freshly tarred.
Next came the bed of gravel for the perforated drain pipe to lay on. The trench went deep to shallow with a natural slope, along the wall, so we didn’t have any problems laying the pipe for drainage. Next came a few more inches of gravel that covered the pipe than we backfilled.
Make sure that rain gutters on the roof are working and capable of accommodating the water from the roof. I added bigger wider gutters in case it was happening, it would help. It was worth a little more time and some money.
Besides the groundwater that I knew was coming in, the water coming off the roof could have been an issue too, and attributed to some of the problems in that area of the house.
Pay attention to all suspected cases. All water is the enemy. Add wider gutters and if you can use the vinyl more expensive kind that snaps together.
Take the downspouts and run them away from the wall away from the house. This can make the difference from that water puddling up against the outside wall and possibly finding another way in.
Conclusion:
After 20 Years The House is Dry
I found this procedure to work well and now am confident that waterproofing the outside existing wall was not only long-term successful, but inexpensive (as long as no corners are cut) and the right decision. You don’t want to do this project again 10 years from now down the road. After 20 years or so I can say with pride, not a drop comes in from where we waterproofed or any other place around my home. A couple of tips I can relate to anybody who is thinking of doing this themselves to save money would be:
Invite friends with strong backs and make it a party. We had so much fun, it was hard to imagine that we saved so much money.
Pre-plan right down to the weather. Talk to a professional contractor who knows the details and equipment you will need. Talking to him gave me not only the right information but confidence as well. When those cold nights come, you want to make sure your heating system performs at a higher efficiency lowering heating costs and saving you money.
How Do You Waterproof a Basement Wall from the Inside?
Prep the wall of old paint
Wash dirt & dust off the wall
Plug Holes & cracks with Hydraulic Cement
Seal Openings in doors, windows & window wells using waterproof caulk
Apply a coat of waterproof masonry cement to your wall
Install a Sump pump
Use a quality dehumidifier
Vent Dryer outside-Cover H2O pipes ……………………………………………………………………………. Read more
![]()
References:
DryCreteWaterproofing- HOW TO WATERPROOF HOUSE FOUNDATIONS FROM THE OUTSIDE
FAQ’s