If you own an inground swimming pool, saving money and energy is always important to keep your pool in good shape, and doing your maintenance can save costs over time. Jobs that you think are hard usually are not. Keep that in mind when the pool needs its bulb changed. It’s easy and if done by yourself can save more than a few bucks. How do you replace a pool light?
- Turn on the pool light- Shut the main breaker off to the swimming pool-light-pool light will turn off
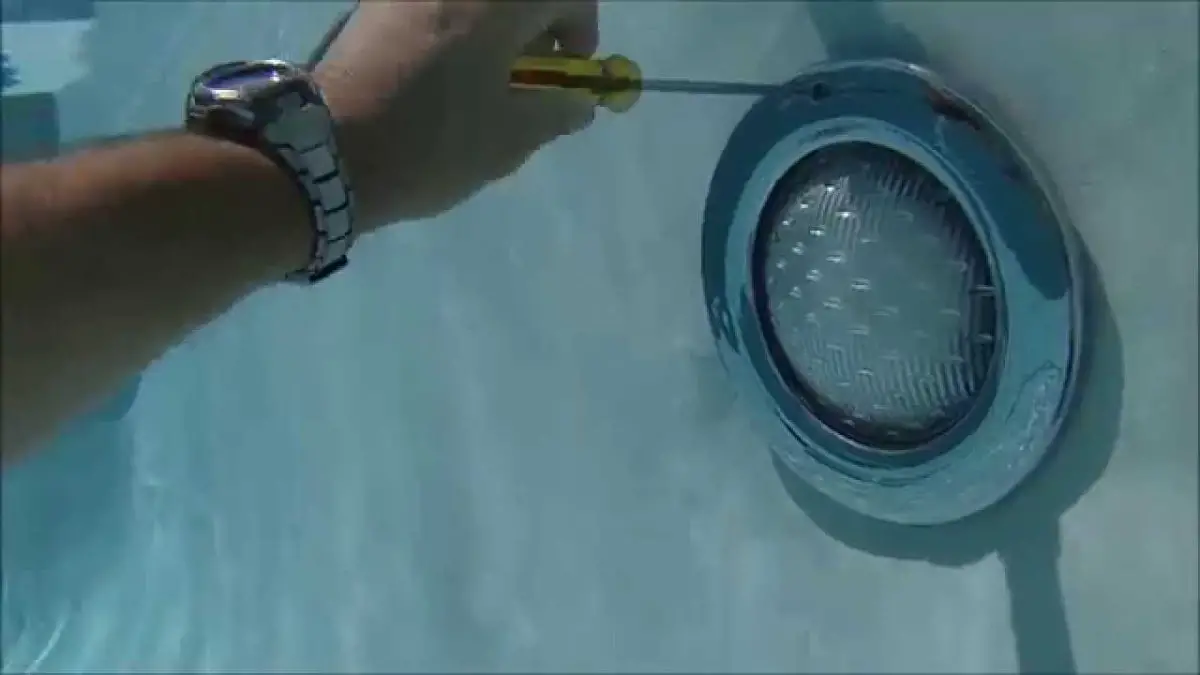
- Remove Screw Holding Light Housing
- Remove the Light Housing
- Loosen Other Screws
- Remove Original Bulb
- Install the Replacement Bulb-LED low-voltage pool light
- Replace Pool Light Housing
- Secure Light Housing Screw
Changing the pool’s light bulb is as easy as changing the light bulb in your home and as long as you don’t become complacent with electrical power to the pool and light then it could save a bunch of money. Follow these directions.
How to Replace Pool Light
Disconnect Electricity to the Pool- I turn the pool light on so I can physically see the juice power off the light by the breaker!
- Energy-intensive process
- High capital costs for infrastructure
- Complex maintenance requirements
- Expensive materials for filtration
- Environmental impact mitigation costs
- Regulatory compliance expenses
- Research and development costs
- Geographic location impacts the cost of intake and discharge structures
Replacement Pool Lighting Bulb Housing
When replacing a pool lighting bulb housing, it’s essential to follow a systematic approach to ensure safety and efficiency. Start by turning off the power to the pool lighting at the circuit breaker to prevent any electrical accidents. Next, remove the existing bulb housing from its fixture by unscrewing or unclipping it, depending on the design.
Inspect the housing for any signs of damage or corrosion, which could affect the performance of the new bulb. If the housing is damaged, replace it with a new one that matches the specifications of your pool lighting system.
Carefully insert the new bulb into the housing, ensuring it is seated securely and aligned properly. Before reinstalling the housing into the fixture, check the rubber gasket or O-ring for any wear or damage and replace it if necessary to maintain a watertight seal. Once the new housing is in place, reconnect the power to the pool lighting at the circuit breaker and test the bulb to ensure it is functioning correctly. If you encounter any difficulties during the process or are unsure about any step, consider consulting a professional electrician or pool technician for guidance.
Use these steps:
- Screwdriver or wrench for removing screws or bolts securing the fixture.
- Replacement pool light bulb compatible with the fixture and pool type.
- Waterproof electrical connectors or sealants for securing electrical connections.
- Replacement gasket or O-ring for ensuring a watertight seal.
- Safety gloves and goggles for protection during the replacement process.
- Insulation resistance tester for checking the integrity of electrical connections.
- Non-conductive ladder for safe access to the pool light fixture.
- Towel or sponge for drying the area around the fixture before and after replacement.
- Electrical tape for securing and insulating electrical connections.
- Instruction manual or guide for specific guidance on the replacement procedure.
LED Pool Lighting
The 120v pool lights are fairly common, and safe when installed correctly according to the National Electrical Code, 12v lights are potentially safer and some of them are even considered “intrinsically safe” by the NEC and UL due to their non-conductive material design and low voltage two wire system.
More and more pool owners upgrade to LED light fixtures which can outperform 120v lights and provide all the beautiful color options for a pool.
Some 120v pool lighting uses a regular bulb socket called a standard Edison base which allows for the replacement of the existing white bulb with a color-change-capable LED light without changing any electrical equipment or another existing wiring to your pool light bulb like adding a 12v step-down transformer. Simply take the bulb out of the lens and housing, open it, and swap the bulb out with this 120v LED pool light fixture.
Pool bulb replacement is a pretty straightforward task just swap out the burned-out bulb from the niche. But something to keep in mind is that your pool bulbs don’t have to be burned out for you to replace them. You can also change a bulb to higher lumens, more energy-efficient LED bulbs that burn a fraction of the energy traditional incandescent pool bulbs do.
Most of the older incandescent and halogen pool bulb light fixtures can be changed to the newer LED color-changing lights by replacing the entire light fixture. However, there are a limited number of old lights that can be converted to LED light by simply replacing the old light fixture bulb with a color-changing LED light bulb.
On average, a pool light will last around 3-5 years depending on the types of bulbs and their voltage level, the type of light housing, the environment, and the amount of use. Halogen and incandescent bulbs typically last an average of 3-4 years while a LED light bulb will last up to 5-6 years.
You can replace your old pool bulb light fixture with an LED bulb. It is a great way to achieve cost savings and increase efficiency and aesthetics. LED pool lights are extremely low maintenance compared to traditional halogen pool lights, and they provide a much brighter, whiter light with a lens that can enhance the beauty and color of your pool.
Additionally, they consume much less energy than standard fixtures, and the bulb can last up to much longer. When replacing your old pool light with an LED, bulb it is important to ensure that you choose the correct lighting fixture that is compatible with your existing pool equipment. Be sure to consult a professional pool contractor or an electrician to ensure that the right voltage and wattage are used for your specific pool lights.
Pool Water Light GFI Bulb Pool Lights
LED pool lighting offers several advantages over traditional incandescent or halogen lights. Firstly, LED lights are highly energy-efficient, consuming significantly less electricity while still providing bright illumination. This results in lower energy bills and reduced environmental impact.
Additionally, LED lights have a longer lifespan compared to conventional bulbs, reducing the frequency of bulb replacements and maintenance costs. LED pool lights also come in a variety of colors and can often be controlled remotely, allowing for customizable lighting effects to enhance the ambiance of the pool area.
Furthermore, LED technology produces less heat, making it safer to use in and around the pool. Overall, LED pool lighting provides an efficient, durable, and versatile lighting solution for swimming pools, offering both practical and aesthetic benefits to pool owners.
- Visual Inspection: Look at the breaker panel and check if the GFCI breaker’s handle is in the middle position, which indicates a tripped state.
- Reset Button: GFCI breakers typically have a reset button located on the breaker itself. If the breaker is tripped, the reset button may be protruding outward slightly.
- Test Button: Most GFCI breakers also feature a test button. Pressing this button should trip the breaker if it’s functioning correctly. After tripping, the reset button may pop out.
- Check Power: Test nearby outlets or devices to see if they have power. If they don’t, the GFCI breaker may have tripped.
- Reset the Breaker: If the GFCI breaker is tripped, you can reset it by firmly pushing the handle to the “off” position and then to the “on” position. This should restore power to the circuit.
- Confirm Power Restoration: After resetting the GFCI breaker, verify that power has been restored to the affected outlets or devices.
If you’re unsure about the status of the GFCI breaker or if it continues to trip repeatedly, it’s advisable to consult a qualified electrician for further inspection and maintenance.
- Turn off the circuit breaker connected to the wet GFCI outlet. This will prevent any electrical accidents as you deal with the GFCI.
- The easiest way to dry out your GFCI electrical outlet is to use a battery-operated hairdryer. Begin with the lowest setting and aim for the moist areas. Don’t put the hair dryer too close to the outlet as the hot air may melt the plastic or the wire insulation. Dry out every outlet that may have been exposed to water.
- Turn on the circuit breaker and check GFCI once you’re sure the electrical outlet is dry. If the electricity is on, reset the GFCI unit. If the GFCI resets without a problem, your issue has been fixed, and you can use the outlet again without worry. If the GFCI immediately trips after you try to reset it, there may still be some lingering moisture in the outlet. It is also possible that the outlet has been damaged and needs repair or it must be replaced.
How to Test Pool Water Light GFCI Outlet to Replace
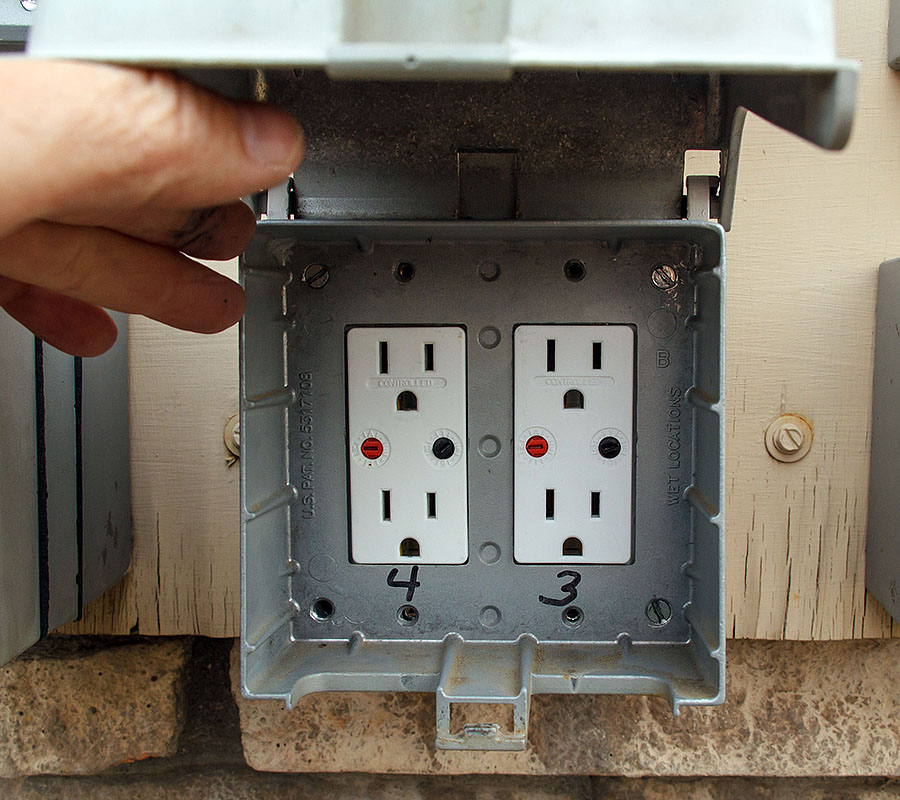
Always Check your Electric wiring and GFI at the filter in the Timer Box. Experts recommend once per month.
- Turn on the Pool Light and Push the GFI Test Button-then Reset the circuit
- Turn on the Pool Pump and Test the GFI Button then Reset the circuit
- Turn on Both the Pump and the Pool Light along with the receptacle with a load on it. The radio is good. Press the Test Button. If it’s all working Reset The GFI and put the filter back on manually.
- GFCI Receptacles contain both a reset button and a test button.
When an electrical current problem is detected, the GFCI can manually be reset by simply pushing the red reset button in the middle of the receptacle. Along with the reset button, there is also a test button that can be used to verify that the GFCI works properly.
To test the GFCI, turn on the pool light and simply press the test button. If it is working correctly, you should hear a snap sound that trips the outlet and cuts off the power, turning off the light or other powered appliances.
Conclusion:
Changing the pool’s light bulb is as easy as changing the light bulb in your home and as long as you don’t become complacent with electrical power to the pool and light then it could save a bunch of money. In conclusion, testing a pool water light GFCI outlet before replacing it is a crucial step to ensure the safety and functionality of the electrical system. By following the outlined steps, you can determine whether the outlet is functioning correctly or if it requires replacement.
Remember to prioritize safety by turning off the power at the circuit breaker before conducting any tests or replacement work. If you encounter any issues or uncertainties during the process, it’s advisable to seek assistance from a qualified electrician to ensure the job is completed safely and effectively. Regular maintenance and testing of GFCI outlets are essential to prevent electrical hazards and ensure a safe swimming pool environment for everyone.
Can you Replace a Pool Light Underwater?
Yes, Replacing pool lights for your in-ground pool does not require draining the water from the pool or hiring a professional. The design of the pool light’s housing and the length of the housing wiring allows you to easily remove it from the pool and change the bulb
![]()
References:
Spruce- How to Change a Pool Light in 5 Easy Steps
FAQ’s
