After years of working on my Inground pool, I’ve run into every kind of situation you could expect. My close buddy who always had problems with his finally asked me for advice this year. I told him what I tell everyone, it’s not what you are doing, it’s the order you do it. Follow this Guide. Opening your Inground Pool in 10 Easy Steps.
- Remove the Cover & Store it away
- Clean Pool Area-Inside & Out
- Connect Your Filtering Equipment
- Fill the Pool- Its Pump & Filter System
- Do Electrical Safety Checks
- Replace Chemicals & Reagents
- Set Filtering System to Recirculate
- Super chlorinate & add algaecide
- Use a Flocculant wait then vacuum
- Balance Water Chemistry
The real secret to opening my inground pool was waiting to watch the joy on my kid’s faces all those years, and now the faces of my Grandkids, that just makes all the hard work well worth it.
Opening An Inground Pool in 10 Easy Steps
When you own a pool, especially a big inground pool the most important tool you can bring to the table is your back There is no substitute for hard work. I will often tell people when they ask me what’s the best product to buy or advice I can make. I say use your head but bring your back. Opening a pool is work. The bigger the pool the more work.
A pool needs to be manually scrubbed. Scrub the heck out of the inside walls and floor once or twice a week. The skimmer and long-handled pool brush is the most important tool you have at the pool site. Especially if there are trees around.
The most important maintenance plan for your pool doesn’t come in a box or a bottle it’s you and some Humph. Even with the best chemicals and sanitizers algae can take hold of your pool and find a way to make a home for itself. That is especially true with concrete or old cement pools.
Skimming your pool daily will pay off. Don’t walk down with a beer in your hand unless you are willing to put it down and pick up a scrub brush or at least a skimmer. I thought about it as a kind of therapy.
Among the secrets to managing your swimming pool is to close your pool at the end of the season the right way and if you do, then it makes the job of opening it much easier and less expensive. Using these proven techniques in the right sequence, you can open an Inground Pool fast, on a weekend or as little as 2 yes 2 days.
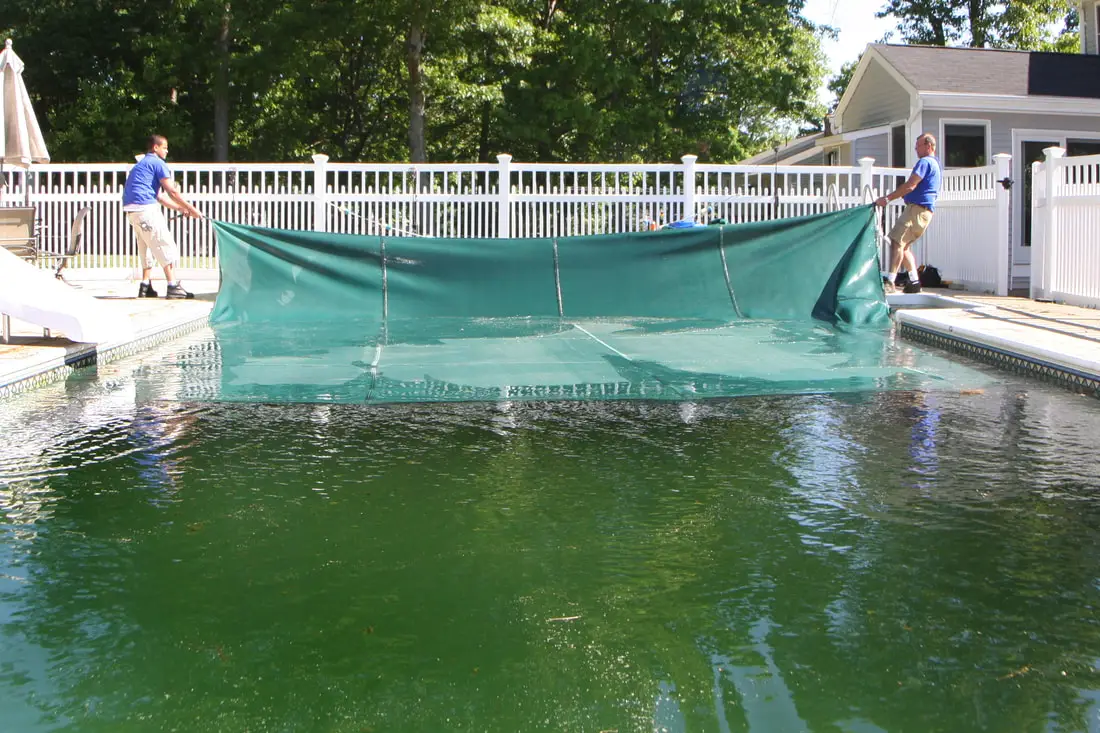
1. How to Remove Pool Cover
It’s time to take the cover off the pool again and a lot of things can happen while you’re taking it off. If your pool is big like mine you are going to need a few people to take it off. If you have trees that are in the vicinity then most likely there will be a mess that is laying on top of your cover.
If you don’t pull the cover off right then most of the trash that is laying on top will slide off and go right back into the pool. This will break up your happy pool opening day Folks. Bring enough people so that there is one person on each corner.
One person for each corner. Two people should walk their ends the length of the pool over to the other 2 people folding the cover in half. Once they reach the other side, pull the cover out of the pool and drag the cover out of the pool area.
Once the cover is out of the pool then spread it out and rinse it off with dish detergent. Make sure you clean both sides and dry thoroughly. It needs to be dry or you will develop mildew and algae slick on the inside of the fold after you put it away for the season. That will rot the cover and ruin it.
2. How To Clean Concrete Around Pool
Once the Cover is Off you’ll see the mess that is covering the pool pavement, coping blocks, apron, and patio. Any concrete that the cover was laying on will be stained from algae and dirt that somehow finds its way under the pool cover where the excess is laying over a hard surface. Do yourself a favor and clean the area right away.
Especially where there are leaf stains. Leaf stains are the hardest stains to remove even if you acid-wash the cement. The longer the stains dry the harder it is to remove to keep the area wet and get the hose on it right away. If you rent or own a pressure washer then use that just clean it as fast as you can. Don’t leave it for the weekend. The stain won’t come up.
Before you stick your hand in any port or pot check to see that are no rodents or snakes spending the winter there. My pool area is near the woods so the cover and skimmer posts attract a lot of critters trying to stay out of the cold.
Next are the skimmer pots that are normally filled with debris. Clean them out and pull the winter expansion plugs. Do it before you start to fill the pool. it will just be a mess if you don’t as all of this stuff is better to handle dry than wet. I like to check behind my pool light. There is a pocket behind the bulb that also fills up with garbage.
Some bigger inground pools have a cement pad that the Pump and Filter sit on. Even though there have been some cold temperatures algae and stains find their way onto the pad and filter vessel. This is a good time to hose this all out and clean the outside of the filter and the pad.
Once you have everything cleared out a mixture of Muriatic Acid works well cleaning cement blocks or concrete. The coping around the pool is going to be stained so get right on it. Just like with any kind of stain once they dry they are harder to remove. Always mix acid to water never water to acid
Start Skimming and Scrubbing the inside of the pool. There is no secret or method, the more you scrub and skim the faster you’ll get there, the fewer chemicals you use the more money you’ll save.
3. How To Install a Swimming Pool Pump and Filter
Hopefully, you drained the whole Pump and Filter and pulled the Drains and Plugs. If you didn’t then there will be cracks somewhere I assure you. This Hayward High-Rate Filter has all the parts listed on this Diagram.
Some things can happen to your system during the long winter months but if you keep all your plugs and parts together from the pump and the filter, you should be able to find them in the spring. I normally keep the small pieces in my filter and the pump in the pump basket.
It holds all the small pieces nicely. The very first thing you need to do is to replace the Drain Cap or the Filter Drain Plug Assembly on the Filter tank where you needed to drain the filter last Fall. Then replace the Pump Drain Plugs for the Pool Pump. The bigger pumps have 2 drain plugs on the pump. Replace the Strainer Basket for the Pump.
Make sure that the Pressure Gauge is put back on. Check the Flange Clamp for looseness. Inspect the O Ring Washer for the Multi-port and the Pump Lid O Ring Gasket. These rubber O Rings go bad. Once it’s buttoned up fill the system from the lid on the Pump Housing and fill the lines.
4. How To Prime a Pool Pump With Sand Filter
Continue to fill your pool until the water level is halfway between the skimmer and the top of the coping blocks. Once you are ready begin taking out the rubber expansion plugs that are in the suction line inside the Skimmer Box and underneath the Skimmer Baskets. Put the plastic Eye Balls back on the discharge lines inside the pool.
Most manufacturers recommend that you fill your system and prime the pump in the Backwash position. This will blow any trash in your system through the pump and out the filter while filling the whole system including the filter with water. Once it’s filled and clear. Shut the power off. The best instruction for a startup will be on a label right on your filter.
Then:
If you are running the pump-Turn your pump off at the timer arm inside the electric box on the dial timer.
Open the lid on the pump and fill the pump and suction lines with water as much water as possible
Set the Multi-Port handle to Backwash
Close the lid on the Pump and Flip the Timer arm to the on position
Fill the lines and filter with water while flushing out through Backwash
Once clear, turn off the power
Set the Multi-Port handle to Rinse-turn power back on and rinse for 30 seconds
If you are having some problems with priming the pump you can pinch off the backwash hose to create some back pressure or use a breather plug on the filter vessel to relieve some air and chase it from the system.
If there is no air breather on the vessel you can turn the pressure gauge slightly at the top of the filter and the air will normally relieve itself out through there and will catch prime right away.
Shut the power down and set the filter handle to the filter position
Turn the Filter and Pump on Manual
5. Electrical Safety Checklist
Always Check your Electric wiring and GFI at the filter in the Timer Box. Experts recommend once per month.
Turn on the Pool Light and Push GFI Test Button-then Reset the circuit
Turn on the Pool Pump and Test GFI Button then Reset the circuit
Turn on Both the Pump and the Pool Light along with the receptacle with a load on it. The radio is good. Press the Test Button. If it’s all working Reset The GFI and put the filter back on manually.
GFCI Receptacles contain both a reset button and a test button.
When an electrical current problem is detected, the GFCI can manually be reset by simply pushing the red reset button in the middle of the receptacle. Along with the reset button, there is also a test button that can be used to verify that the GFCI works properly.
To test the GFCI, plug in a light or some other appliance and simply press the test button. If it is working correctly, you should hear a snap sound that trips the outlet and cuts off the power, hence turning off the light or other appliance.
You can also use a voltage tester to confirm that the GFCI did turn off the power and works correctly. It is suggested to test your GFCI once a month to ensure that the outlet is providing full protection for your household. Watch Video:
HOW TO INSTALL A GFCI OUTLET
6. Replacing Chemicals & Test Kit Reagents
Most people giving advice on the internet get this one wrong. Do Pool chemicals have a shelf life?-Yes they do. It’s a bad idea to try and store chemicals especially outside near the pool. It’s also not a good idea to store them in your garage because of the stability and Reaction properties of the chemicals.
Some pool chemicals are very stable like Algaecide or clarifiers that can be stored and left down in your pool storage area. I try and get rid of everything before I put the Cover on. Especially Algaecide. It just will just help more when you open the pool back up in the spring. There is no need to be storing Pool chemicals. Dump them in the fall right in the pool.
If you run a good tight maintenance program you won’t need to be left at the end of the season holding chemicals. Especially Chlorine. Sometimes that’s not possible.
I use a rule of thumb that Chemicals and Test Reagents are bought every year. Once a year-Once a season. If the containers have never been opened and are sealed that would be an exception. Treat opened containers and packages of chemicals as hazardous materials.
7. How to Bleed Air From Pool Pump
For the first week or so run the filter manually and then when the pool water is chemically stabilized and clean adjust your pump’s timer to run at the best time, normally in the middle of the night when your rates of electric usage are the lowest. The first week is when you will be scrubbing and skimming the most. Run the filter 24-7.
You will be backwashing the most too. You will need to eyeball the pressure gauge during this time to make sure you are not running the filter loaded and hot.
Most motors for Pool pumps will have the safety shutoff that is equipped with the system. The safety switch will keep the motor from overheating by shutting down the filter pump. If the pumps going to get clogged it will be in that first week when the Pool is the dirtiest. After a week of Backwashing and cleaning, things will start to settle down.
After the bulk of the organic and inorganic material is out of the water, it’s time to add the chemicals and create that pure beautiful, picture-perfect water that everyone depends on you to maintain for the rest of the summer.
8. Shock Pool and Add a Flocculant
Super Chlorinate- Add Flocculant but Bump up the pH first the pool should turn a cloudy color and milky consistency. This will tell you that chlorine is killing organic material and nasty stuff in the water. Add a flocculant not a clarifier or polisher but something a little heavier. Then let that sit overnight.
9. How to Vacuum Pool to Waste
Vacuum the bulk of organic and inorganic material on the bottom of the Pool to waste before switching over to Filtering this will ensure you don’t foul your Filter and cause any extra stress on the pump. If you like to use the skimmer basket to remove any bigger stuff the less you put through the Filtering System the better it is on the whole system.
10. Adding Pool Chemicals In Order
People always ask me what is the most important test for a swimming pool. I will always say for Balanced Chemistry in your Swimming Pool You need to ensure that Total Alkalinity is in the Right Range. The first test you will be taking with your new Test Kit this season is the most important test, Total Alkalinity.
Total alkalinity refers to the ability of the pool water to resist a change in PH. The key purpose total alkalinity serves is to help control the pH in the pool. It does this by acting as a buffer so that when dirt, materials, or the kid’s hinnies are added to a pool that would otherwise cause the pH to go up or down.
If the Alkalinity is balanced, these changes are managed and do not result in fluctuations in PH or free chlorine Simply put everything else comes afterward in a chemical reaction.
When a substance is added to pool water that could affect the pH, total alkalinity will buffer it and help keep the pH in the desired range. Total alkalinity does not determine what the pH will be but rather acts to help keep the pH in the range desired. Total alkalinity is measured in parts per million (ppm) using a total alkalinity test kit. It is best kept in the range of 80-120 ppm.
When the total alkalinity value is less than 80 ppm, the water can become aggressive and the pH can swing easily upward and downward. If the value is higher than 120 ppm the water can become cloudy and scale forming and the pH will tend to drift upward. If you leave for vacation for a week and the pool is blue when you come back it is mostly due to Alkalinity. After Total Alkalinity comes to ph.
Keep your pool scrubbed and Chemically balanced by using a dependable kit and reagents for Testing Pool Water.
Pool Water Testing Instructions
- Total Alkalinity-Opening Day-Then Once a week-and Adjust
- PH-Opening Day-Everyday-Adjust
- Shock Chlorine-Opening Day-Than Once a Week Depending on Use-Vacuum & Backwash
- Chlorine Residual-Opening Day-Everyday if the Pool is used frequently-Adjust
- Hump!! -Opening Day-Everyday if the pool is used frequently
- Phosphate Removal-(once a year maybe) (if it’s high drop some water and Re-Fill)
If the PH is within Range then your Sanitizer will work efficiently and there will be no problem chemically in your Pool. If You used some Humph! that we talked about earlier then your swimming pool will be the best it can be.
Pool owners should remember that when super chlorinating or shocking your swimming pool, chlorine in a granular or liquid form can mess with pH levels. If you run a tight ship and have a well-balanced pool, your pool’s water chemistry can handle any changes that come your way and any negative effects that come with using Chlorine.
Chemicals Needed For Pool Start-Up
Chlorine
PH Plus & PH Down
Muriatic Acid
Alkalinity Plus
Algaecide Preventative-Pool Opening-Once every other week or every week in August is when most parts of the Country have the hottest days. Heat and sunlight affect chlorine disinfection.
Clarifier-Flocculants-Pool Opening-Normal Conditions Every 2 Weeks-Use in conjunction with Shock Chlorine-Algaecide and Flocculant also called Polisher
Anytime you use Muriatic acid-H2o mix-pour it into a Plastic Watering Can and distribute it anywhere that needs cleaning. Understand that it will affect PH so don’t overdo it.
Safety Goggles -Chemical Gloves-Cement Brush or rough scrub brush to clean the Inside & Outside Pool Area
Long Handle Skimmer
Long Handle Leaf Basket
Long Handle Brush
Keeping a great-looking healthy swimming pool is not as hard as you think. It starts at the beginning, working off that success you had last right until you put the cover on. The next time you’re in your swimming pool reach down, grab a handful of water and squeeze your fingers together. Hard water will fall and break apart.
The process of opening your inground pool is easier to start right where you left off and put everything in reverse. Starting with the pool cover make sure it’s clean and dry and free of bacteria. Use an algaecide then rinse it thoroughly. Put it back in the same place you store winter equipment.
If It’s thin with no consistency Soft water slides out and feels soft, and silky and you can see and feel the difference. The objective of owning a swimming pool is to operate it for the least amount of cost and the most amount of enjoyment. The alternative is the loss of control, money, and the time it takes to get it back. Be the master of your Swimming Pool!
How To Paint an Inground Pool
If your pool is drained you may want to paint it for more information on swimming pools inground & above ground stay here on MyWaterEarth&Sky- Every 5 to 10 years it’s necessary to paint the pool to keep it looking beautiful. To get it done by a professional company would cost an arm and a ………….… Continue reading
![]()