The difference between A Public and Private Drinking water system is that Public water systems are regulated and tested continually. Private Wells are not regulated and are left up to the owner to be tested. One way to ensure the reliability of your Well is to test and disinfect your Well with bleach every few years. This is a simple uncomplicated solution on How to Disinfect a Well with Bleach?
- Calculate Bleach Amount: Use formula: Bleach (oz) = Well Depth (ft) × 0.5 / 100.
- Prepare Solution: Mix bleach with H2O
- Pour into Well
- Activate Pump: for circulation.
- Run Taps: Open taps in-house
- Let Sit: 12-24 hrs. (disinfection)
- Flush System: Run taps until no chlorine odor.
- Test Well H2O: (verification)
You should make sure that any testing you do for drinking water is done by a State Certified Lab that is easy to find and is normally recommended by the Health Department in your County. You also should be aware of any construction that may affect groundwater or neighbors getting their Private Wells cleaned. It’s good to be a little nosey when the health of your family is at stake.
Introduction:
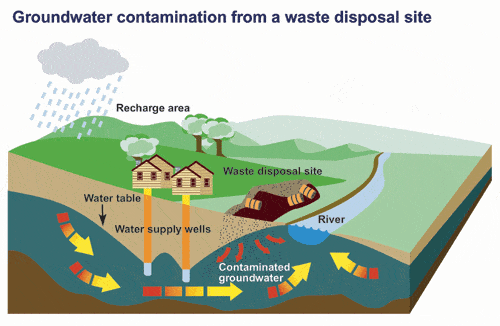
Shocking you’re private Well and monitoring the quality of your well water is putting you in charge of your drinking, which no one will do for you unless you take action. Owners need to be aware of the harmful contaminants that can enter their wells and drinking water. Private well systems can be contaminated by naturally occurring or man-made activities.
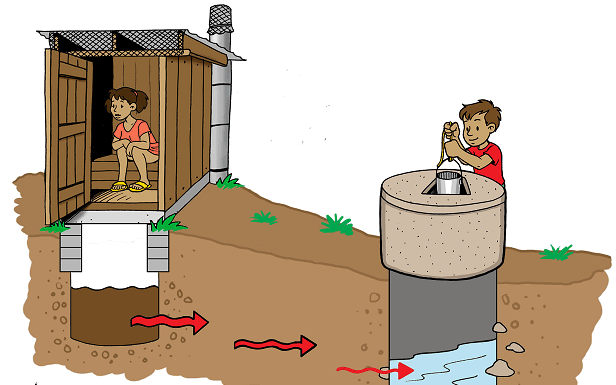
When you purchase a house it’s important that you know the territory surrounding your new home especially if your home depends on drinking water from a Well system. If your home is in a rural area your well may be contaminated by farms, crop fields, or septic systems that are nearby. Shallow Wells that are perfectly fine and work for years can fail after only a few years of supplying a home with good clean water.
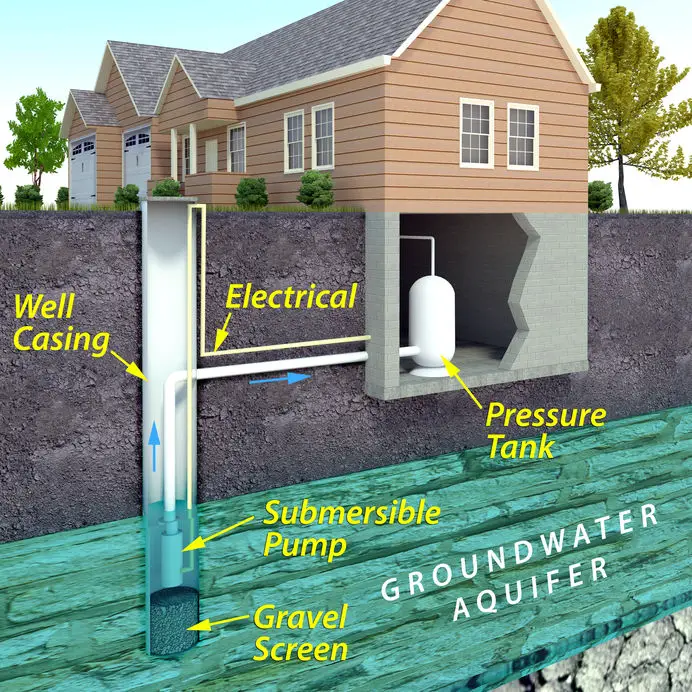
Understanding Well Water System Disinfection with Bleach
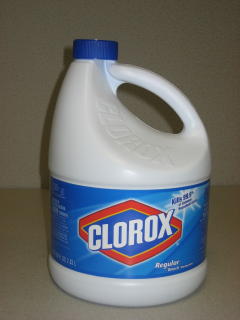
Well water systems require regular maintenance to ensure that the water supplied is safe for consumption. At the heart of this process is well disinfection, a critical aspect for well owners to understand and perform correctly. The importance of disinfecting wells cannot be overstated, particularly when the water tests positive for bacterial contamination. Disinfection helps to restore the purity of the water, making it safe for drinking, cooking, and all other uses. The most common method of disinfecting a well involves using chlorine bleach, a powerful disinfectant that’s effective against a wide range of microbial contaminants.
Chlorinating a well with bleach is a straightforward process, but it must be performed carefully to achieve the desired level of disinfection. Chlorinated water resulting from bleach treatment boasts a reduced presence of harmful microorganisms. When disinfecting your well, calculating the appropriate amount of chlorine bleach is vital; too much can lead to overly chlorinated water, while too little may result in inadequate disinfection. The key is to strike a balance that allows the chlorine to do its job without making the water undrinkable.
Bleach, which is composed of a chlorine compound, is highly effective at killing bacteria and viruses that may be present in your well. However, it’s important to understand the process of disinfecting with bleach and follow the recommended guidelines.
Mixing the chlorine bleach with water before adding it to the well can help ensure even distribution throughout the system. After disinfecting, it is necessary to flush the system until the chlorine smell dissipates to ensure the water is not overly chlorinated.
Well disinfection using bleach is not just a one-and-done task; it’s a critical maintenance routine to be repeated periodically or after any breach of the system, such as flooding or repair work. Disinfecting with chlorine bleach, which breaks down to harmless components, leaves behind chlorinated water initially, but upon flushing, normal water chemistry is typically restored. A chlorine test kit can help verify the removal of excess chlorine following the disinfection process.
In summary, disinfecting your well is a safeguarding measure that shouldn’t be overlooked. The use of chlorine bleach for well disinfection is widely recognized for its efficacy and ease of use. Chlorine’s powerful disinfecting properties ensure that your well water remains free from pathogens and safe for all household uses.
Always remember safety first when using bleach, and never hesitate to seek professional assistance if you’re unsure about any part of the disinfection process. With proper well disinfection, you can enjoy the peace of mind that comes from knowing your drinking water is clean, safe, and chlorinated only to the extent necessary to protect your health.
Identifying Well Water System Pollution Sources
Identifying sources of pollution in a well water system involves a comprehensive assessment of potential contaminants. Conducting regular water quality tests is crucial to detect changes in parameters such as pH, nitrate levels, and microbial content. Additionally, inspecting the wellhead, nearby septic systems, and agricultural activities in the vicinity can help pinpoint specific pollution sources
The safety of groundwater is paramount for those relying on private wells, with concerns intensified for households responsible for child care and anyone consuming this water directly from their water system. The prevalence of wells in rural and suburban areas means that groundwater safety cannot be overlooked. Pollutants can infiltrate this critical water system, underscoring the need for regular water testing a preventative measure as vital as any other aspect of well maintenance. Groundwater safety hinges on identifying potential pollution sources, which may range from agricultural runoff to malfunctioning septic systems.
For homeowners who cherish the safety of their family’s drinking water, the value of rigorous water testing is clear. It helps maintain the delicate balance required for a safe water system, particularly in wells that serve as the primary water source. Considering how wells are directly connected to groundwater, any compromise can lead to significant safety concerns. Well water pollution impacts not just taste and clarity, but also the overall safety of the water system, necessitating vigilant monitoring and maintenance of wells.
The practice of water testing allows well owners to keep tabs on the safety of their groundwater, ensuring that the potable water they rely on remains uncontaminated. This is especially crucial in settings where the dependability of the water system is a linchpin of daily life, including homes that fulfill a child care role, where water safety is even more crucial. As wells tap directly into groundwater sources, the implications of compromised safety are profound. Regular water testing is, thus, a keystone in the overarching preservation of groundwater quality and safety.
When pollutants are detected through water testing, disinfecting wells with bleach becomes the go-to solution. This process not only secures the safety of the groundwater and water system but also reassures those responsible for child care that their wells are dispensing clean water.
Knowing that groundwater feeds directly into their wells, safety-conscious homeowners understand the significance of this purification step. Although the integrity of groundwater is usually robust, wells can occasionally become conduits for contaminants. In such instances, well owners must act decisively to restore their water system to its optimal safety state.
Ultimately, the integrity of wells is largely dependent on the safety of the surrounding groundwater. Through diligent water testing, issues can be detected and resolved, ensuring the continuous safety of the water system. It’s particularly meaningful for settings involving child care, where the safety and cleanliness of water from wells is crucial. Hence, groundwater health that feeds the well should be uncompromised.
Symptoms of a Well Water Problem and Safety Concerns
Access to clean drinking water is a fundamental necessity, yet many homeowners rely on private wells that can occasionally experience issues affecting water safety. Identifying symptoms of a well water problem is crucial for maintaining health and safety. The taste and smell of your drinking water are often the most immediate indicators; a foul taste or an unusual smell can signal contamination by various contaminants. Discoloration and turbidity are visual warning signs, hinting at the presence of suspended particles or iron bacteria, which could point toward contamination sources requiring prompt attention.
Concerns regarding health risks soar when dealing with waterborne illnesses, potentially lurking in a compromised well. Unseen microbes, including harmful pathogens, may proliferate unchecked without proper preventive measures. Moreover, the presence of contaminants unknown to the consumer gives more reason for regular water safety assessments. When Well water contamination is suspected, utilizing a proven solution like bleach offers an effective method for disinfection, eliminating microbes and providing a safeguard against health hazards.
Well water systems, the lifeline for many rural households, are susceptible to various contamination forms. Recognizing early warning signs, such as changes in taste or smell, is part of adopting comprehensive food safety and child care practices. Neglecting these signs could expose family members to severe health risks, as drinking water directly correlates with overall well-being and safety. Furthermore, the implications for food safety are profound when contaminated water is used in food preparation, emphasizing the necessity for vigilant water testing and remediation.
Symptoms of a Well Water Problem and Safety Concerns- top 10 list
- Discoloration
- Foul odor
- Unpleasant taste
- Presence of sediment
- Low water pressure
- Abnormal sounds
- Corrosion in pipes
- Skin irritation
- Gastrointestinal issues
- Bacterial contamination
To ensure water safety, a practical solution involves disinfecting your well with bleach—a process that effectively addresses most microbial concerns. It’s important that the well owner takes safety precautions when handling bleach, following specific well disinfection guidelines.
Discoloration and changes in smell or taste following bleach treatment should subside, indicating a reduction in contamination. Nonetheless, repeated instances of these symptoms might suggest more persistent issues with the well system or external pollution sources that must be identified and resolved.
In addressing child care and overall household health, maintaining the safety of your well should be seen not just as a routine task, but as an essential preventive measure. In rural areas, where wells are the cornerstone of daily life, this becomes doubly true. Incorporating water testing into regular household maintenance can preemptively curb the infiltration of pathogens and contaminants, thus ensuring the continued safety of your drinking water supply.
Ultimately, regular monitoring and maintenance are pivotal for well water safety. The symptoms of a well water problem—ranging from funny tastes to unsettling smells, shifts in clarity to unexpected discoloration—signal the urgent need for disinfection. With the proper safety measures and timely use of solutions like bleach disinfection, well owners can tackle microbes, pathogens, and turbidity, thereby safeguarding their drinking water from contamination and ensuring the health and safety of their families.
When to Get Your Well Water Tested for Quality Assurance
It is recommended to test your well water regularly, at least once a year, to ensure its quality and safety. Additionally, testing should be conducted after any major maintenance or repairs to the well system. If there are noticeable changes in taste, odor, or color of the water, or if there are nearby environmental changes or contamination events, immediate testing is advisable to maintain the well’s quality assurance.
Ensuring the safety and quality of your well water system demands regular testing as an essential component of quality assurance. It’s crucial to test for bacteria, nitrates, lead, and other contaminants periodically to maintain safety standards and safeguard your health.
Comprehensive analysis of your water quality can reveal if harmful pathogens are present and whether your water’s pH and mineral content indicate hard water or other issues that could affect your daily use and appliances. Certified labs are the go-to resource for accurate and dependable water testing, offering detailed test results that help homeowners take corrective actions.
 While many experts recommend annual testing to detect any significant changes in water quality, the exact testing frequency should align with both EPA standards and health department guidelines.
A thorough water test will cover bacteria count, including coliform and E. coli, levels of nitrates and nitrites often from agricultural runoff, and the presence of lead which can leach from old plumbing. Municipal water systems undergo rigorous testing, but private well owners are responsible for monitoring their unique water systems to ensure they meet safety standards.
If you have a water system that has not been analyzed for a year or more, or if you notice symptoms of a water problem, such as discoloration, odors, or an unpleasant taste, it’s time to get your water tested.
Situations that necessitate a water sample for testing include natural disasters, nearby construction, or changes in land use that may increase the risk of contaminants infiltrating your well water system. Post-disinfection with bleach is also an optimal moment for lab testing to confirm that the pathogens have been effectively eliminated from your water system, and that it’s safe to resume consumption without concerns
Regular testing, especially after identifying potential pollution sources, can prevent health risks before they escalate. Using a certified lab for water testing ensures that the test results meet strict regulatory criteria and can be compared against EPA standards for quality assurance.
Health department guidelines also stipulate specific circumstances under which more frequent testing should be considered, such as the introduction of new household members with vulnerable immune systems or pregnancy. The lab testing process for well water involves taking a water sample from your water system, which should be done according to prescribed methods to avoid sample contamination and ensure accurate results.
Ultimately, consistent monitoring of pH levels, mineral content, and the absence or presence of hard water provides a baseline for your water system’s condition. Homeowners should heed the advice of professionals regarding regular testing, relying on comprehensive analysis from certified labs to execute well-water system management aligned with quality assurance goals. By adhering to health department guidelines, considering the suggested annual testing, and being vigilant about any hints of contaminants, you can maintain a well water system that meets safety standards and provides peace of mind.
Guidelines for Water Well Safety Inspection
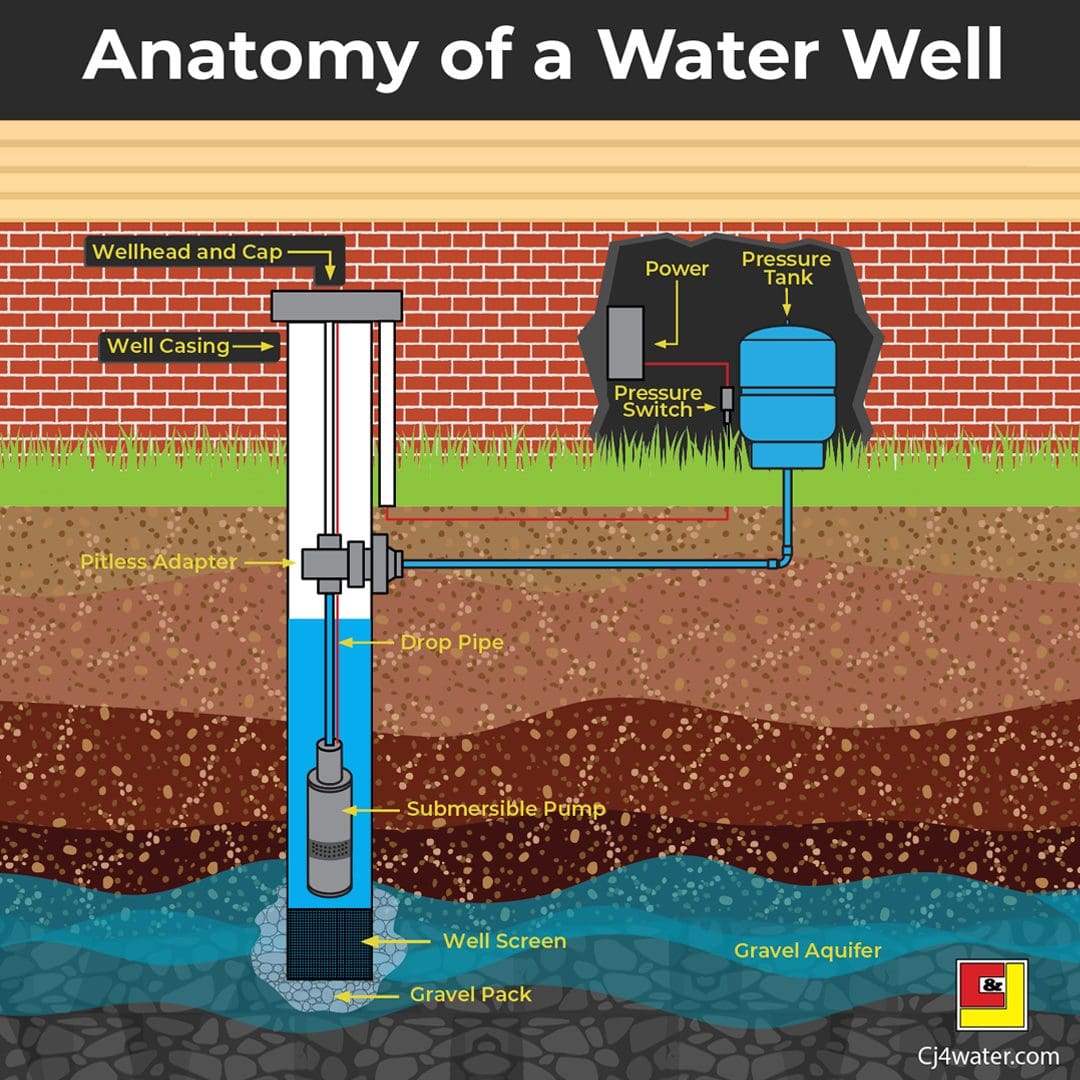
Ensuring the safety and structural integrity of your water well is a significant aspect of well maintenance, which is why adhering to a comprehensive safety inspection guideline is essential. Regular inspections are crucial in assessing well integrity, including casing and cap inspection, to protect against contamination. To maintain the high standards required for clean drinking water, visual inspection of the wellhead for vermin proofing should be coupled with checking proper seals, such as the cap and sanitary seal, to prevent surface runoff from compromising the water quality.
- Performing a water well safety inspection is crucial to ensure the integrity of the system.
- Start by checking the well cap for proper sealing and security to prevent contamination.
- Inspect the well casing for any signs of damage, corrosion, or breaches.
- Verify the clearance around the wellhead to prevent surface water infiltration, and examine the surrounding area for potential sources of pollution.
- Lastly, schedule regular professional inspections to assess the well pump, electrical components, and overall functionality, adhering to established guidelines for well maintenance and safety.
An annual inspection is a staple in any maintenance checklist, and it’s a practice that not only aligns with guideline adherence but also serves as a preventive measure for food safety concerns. During the inspection, contaminant testing is performed, which is as pivotal for maintaining water safety as it is for sustaining food safety, given that water quality directly impacts related agricultural uses. Water testing at least once a year, or more frequently if previous issues have been noted, encompasses screening for both biological and chemical pollutants that could jeopardize health and safety.

When conducting a safety inspection, it’s essential to verify the condition of the well’s distribution system, including checking valves such as check valves to ensure backflow prevention. Similarly, checking the pressure tank is part of a thorough inspection, safeguarding the distribution system’s functionality. If identifying well-water system pollution sources was previously a challenge, these careful examinations during safety inspections can provide crucial insights into potential pollution pathways.
Moreover, it’s worth noting that while a hands-on approach can be valuable, professional inspection services offer a depth of expertise and often comply with the latest safety and inspection standards, supplementing your efforts to keep your well in top condition. They’re well-versed in wellhead protection and can provide strategic recommendations for maintaining the well’s safety over time.
Within the sphere of well maintenance, it’s imperative to remember that contamination prevention extends beyond the immediate structure of the well. Ensuring the area around the well does not contribute to potential contamination is a facet of safeguarding water quality. This includes creating barriers against surface water which may carry contaminants that could seep into the well, thereby compromising food safety and necessitating extensive water testing to identify and mitigate the issue.
Ultimately, the goal is to ensure that the drinking water sourced from wells meets the highest standards of safety and purity. Implementing a routine maintenance checklist, adhering to recommended guidelines, and undertaking both visual and professional inspection can diminish the risks of well water problems and safety concerns. And, when the time comes for well water system disinfection with bleach, you’ll have the assurance that comes from knowing that your well’s integrity has been dutifully preserved through diligent safety inspections.
Symptoms of a Well Water Problems and Safety Concerns
Access to clean drinking water is a fundamental necessity, yet many homeowners rely on wells that can occasionally experience issues affecting water safety. Identifying symptoms of a well water problem is crucial for maintaining health and safety.
The taste and smell of your drinking water are often the most immediate indicators; a foul taste or an unusual smell can signal contamination by various contaminants. Discoloration and turbidity are visual warning signs, hinting at the presence of suspended particles or iron bacteria, which could point toward contamination sources requiring prompt attention.
Concerns regarding health risks soar when dealing with waterborne illnesses, potentially lurking in a compromised well. Unseen microbes, including harmful pathogens, may proliferate unchecked without proper preventive measures.
Moreover, the presence of contaminants unknown to the consumer amplifies the importance of regular water safety assessments. When contamination is suspected, utilizing a proven solution like bleach offers an effective method for disinfection, eliminating microbes and providing a safeguard against health hazards.
Well water systems, the lifeline for many rural households, are susceptible to various contamination forms. Recognizing early warning signs, such as changes in taste or smell, is part of adopting comprehensive food safety and child care practices.
Neglecting these signs could expose family members to severe health risks, as drinking water directly correlates with overall well-being and safety. Furthermore, the implications for food safety are profound when contaminated water is used in food preparation, emphasizing the necessity for vigilant water testing and remediation.
To ensure water safety, a practical solution involves disinfecting your well with bleach—a process that effectively addresses most microbial concerns. It’s important that the well owner takes safety precautions when handling bleach, following specific well disinfection guidelines. Discoloration and changes in smell or taste following bleach treatment should subside, indicating a reduction in contamination. Nonetheless, repeated instances of these symptoms might suggest more persistent issues with the well system or external pollution sources that must be identified and resolved.
In addressing child care and overall household health, maintaining the safety of your well should be seen not just as a routine task, but as an essential preventive measure. In rural areas, where wells are the cornerstone of daily life, this becomes doubly true. Incorporating water testing into regular household maintenance can preemptively curb the infiltration of pathogens and contaminants, thus ensuring the continued safety of your drinking water supply.
When to Get Your Well Water Tested for Quality Assurance
Ensuring the safety and quality of your well water system demands regular testing as an essential component of quality assurance. It’s crucial to test for bacteria, nitrates, lead, and other contaminants periodically to maintain safety standards and safeguard your health.
A comprehensive analysis of your water quality can reveal if harmful pathogens are present and whether your water’s pH and mineral content indicate hard water or other issues that could affect your daily use and appliances. Certified labs are the go-to resource for accurate and dependable water testing, offering detailed test results that help homeowners take corrective actions.
While many experts recommend annual testing to detect any significant changes in water quality, the exact testing frequency should align with both EPA standards and health department guidelines. A thorough water test will cover
- Bacteria count
- Coliform
- E. coli
- Levels of nitrates
- Nitrites often from agricultural runoff
- The presence of lead which can leach from old plumbing.
Municipal water systems undergo rigorous testing, but private well owners are responsible for monitoring their unique water systems to ensure they meet safety standards. If you have a water system that has not been analyzed for a year or more, or if you notice symptoms of a water problem, such as discoloration, odors, or an unpleasant taste, it’s time to get your water tested.
Situations that necessitate a water sample for testing
- include natural disasters
- nearby construction
- any changes in land use that may increase the risk of contaminants infiltrating your well water system.
Post-disinfection with bleach is also an optimal moment for lab testing to confirm that the pathogens have been effectively eliminated from your water system, and that it’s safe to resume consumption without concerns.
Regular testing, especially after identifying potential pollution sources, can prevent health risks before they escalate. Using a certified lab for water testing ensures that the test results meet strict regulatory criteria and can be compared against EPA standards for quality assurance.
Health department guidelines also stipulate specific circumstances under which more frequent testing should be considered, such as the introduction of new household members with vulnerable immune systems or pregnancy. The lab testing process for well water involves taking a water sample from your water system, which should be done according to prescribed methods to avoid sample contamination and ensure accurate results.
Ultimately, consistent monitoring of pH levels, mineral content, and the absence or presence of hard water provides a baseline for your water system’s condition. Homeowners should heed the advice of professionals regarding regular testing, relying on comprehensive analysis from certified labs to execute well-water system management aligned with quality assurance goals. By adhering to health department guidelines, considering the suggested annual testing, and being vigilant about any hints of contaminants, you can maintain a well water system that meets safety standards and provides peace of mind.
Guidelines for Water Well Safety Inspection
Ensuring the safety and structural integrity of your water well is a significant aspect of well maintenance, which is why adhering to a comprehensive safety inspection guideline is essential. Regular inspections are crucial in assessing well integrity, including casing and cap inspection, to protect against contamination. To maintain the high standards required for clean drinking water, visual inspection of the wellhead for vermin proofing should be coupled with checking proper seals, such as the cap and sanitary seal, to prevent surface runoff from compromising the water quality.
- Well Cap Inspection: Ensure the well cap is properly sealed and secure to prevent contamination.
- Casing Examination: Inspect the well casing for signs of damage, corrosion, or breaches that could compromise the well’s integrity.
- Clearance Check: Verify proper clearance around the wellhead to prevent surface water infiltration, and address any potential sources of pollution in the vicinity.
- Surface Area Inspection: Examine the surrounding area for contaminants, potential runoff, or changes that could affect the well’s water quality.
- Regular Professional Inspections: Schedule routine professional inspections to assess the well pump, electrical components, and overall functionality according to established guidelines.
These guidelines are essential for maintaining a safe and reliable water well system, and regular adherence to them helps prevent potential issues and ensures the continued quality of the water supply.
An annual inspection is a staple in any maintenance checklist, and it’s a practice that not only aligns with guideline adherence but also serves as a preventive measure for food safety concerns.
During the inspection, contaminant testing is performed, which is as pivotal for maintaining water safety as it is for sustaining food safety, given that water quality directly impacts related agricultural uses.
When conducting a safety inspection, it’s essential to verify the condition of the well’s distribution system, including checking valves such as check valves to ensure backflow prevention. Similarly, checking the pressure tank is part of a thorough inspection, safeguarding the distribution system’s functionality.
If identifying well water system pollution sources was previously a challenge, these careful examinations during safety inspections can provide crucial insights into potential pollution pathways.
Moreover, it’s worth noting that while a hands-on approach can be valuable, professional inspection services offer a depth of expertise and often comply with the latest safety and inspection standards, supplementing your efforts to keep your well in top condition.
They’re well-versed in wellhead protection and can provide strategic recommendations for maintaining the well’s safety over time. Within the sphere of well maintenance, it’s imperative to remember that contamination prevention extends beyond the immediate structure of the well.
This includes creating barriers against surface water which may carry contaminants that could seep into the well, thereby compromising food safety and necessitating extensive water testing to identify and mitigate the issue.
Ultimately, the goal is to ensure that the drinking water sourced from wells meets the highest standards of safety and purity. Keeping a routine maintenance checklist, adhering to recommended guidelines, and undertaking both visual and professional inspection can diminish the risks of well water problems and safety concerns. And, when the time comes for well water system disinfection with bleach, you’ll have the assurance that comes from knowing that your well’s integrity has been dutifully preserved through diligent safety inspections.
Steps for Disinfecting a Domestic Well with Shock Chlorination
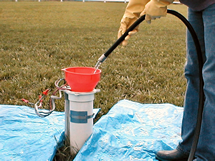
Shock chlorination is a crucial procedure for maintaining the purity of your domestic well and ensuring that your water system is free from harmful bacteria. This disinfection process involves introducing a high concentration of chlorine solution, typically in the form of sodium hypochlorite, into the well, making it an effective bacteria elimination strategy. When undertaking this sanitization method, its essential to have a clear understanding of the steps involved and to ensure that all well components from the distribution system are targeted for complete coverage.
Once you’ve prepared the chlorine solution and taken the requisite safety measures, the next step in the procedure is to add the solution to the well, ensuring thorough mixing which is critical for effective disinfection. The mixture must come into contact with all parts of the well and water system.
This may involve running water through the distribution system to reach all pipes and fixtures. The importance of contact time cannot be overstated; the chlorine must be allowed enough time to work on eliminating any bacteria present. Follow the user instructions carefully to provide the correct contact time.
During the well cleaning process, you should continuously monitor the water system, checking the water level and ensuring that the chlorine solution maintains the necessary high concentration for the procedure to be effective. After completing the sanitization, it is important to thoroughly flush the system to remove the chlorine from the water system and ensure that the well water is safe to use.
Testing the water system post-shock chlorination is also a crucial step. This is part of the well component clean-up that helps to establish whether the disinfection process has been successful in bacteria elimination. Regular testing, as part of an overall well maintenance schedule, is the best way to ensure that your domestic well remains clean and that the water system is functioning properly.
In conclusion, the shock chlorination method is an effective means of disinfecting wells and should be done following the steps outlined, observing safety precautions, and considering the dilution rates and contact time to ensure complete coverage. It’s advisable to have your water system checked and the well water tested regularly to maintain a high standard of water quality and protect your household’s health.
Formula to Calculate the Required Bleach for Shock Chlorination Disinfection
Conducting a successful disinfection of a well requires a precise formula to calculate the required bleach amount for an effective shock chlorination treatment. Delineating the specifics of this technique provides water system owners with the tools necessary to ensure the safety and cleanliness of their wells.
Utilizing chlorine bleach, a powerful contact solution against microbial contaminants, the process revolves around achieving a chlorine ratio optimal for a thorough disinfection. As an essential component of well maintenance, understanding and applying the correct dilution ratio is a key safeguard to protect the water system from a variety of impurities.
To determine the bleach amount necessary for shock chlorination, one must evaluate several factors: the water volume, the ppm concentration targeted, well depth, and the corresponding parts per million required to purge pathogens effectively.
The formula to calculate the amount of bleach required for shock chlorination disinfection of a well is:
Amount of Bleach (in ounces)=Well Depth (in feet)×0.5100
*This formula is a general guideline, and the specific concentration of bleach and well characteristics may require adjustments. It’s crucial to follow recommended guidelines from local health authorities or consult with a water treatment professional to ensure proper disinfection and safety.
It’s imperative to grasp that the ppm concentration for a standard disinfection usually falls within a specified range to guarantee a complete sanitization process. Estimating the water volume within the well involves considering the wells diameter, and depth, thereby leading to an accurate chlorine ratio calculation. To achieve the desired ppm concentration, a direct relationship between the volume of water and the bleach amount must be established.
A typical well may demand chlorine bleach to be added until a residual of chlorine in the range of 50 to 100 parts per million, a level sufficient for most shock chlorination purposes. The dilution ratio should assure that the contact solution thoroughly mixes with the entire water system, reaching every section where pathogens could reside.
Calculating the necessary bleach volume for the water system’s shock chlorination takes into account not only the aforementioned well characteristics but also the existing chlorine levels within the wells, to avoid excessive dosages which can harm the water system’s structural integrity.
The exact amount of chlorine bleach is of paramount importance, as it must be adequate to permeate through the entire water system without being too diluted or excessively concentrated.
A balance must be struck, using the proper formula, to achieve a ppm concentration that effectively rids the wells of contaminants while making sure the chlorine ratio is safe for future consumption following the disinfection process. Thus, the shock chlorination procedure, essential to maintaining pure water in the water system, relies on careful calculation, especially when dealing with wells that serve as primary drinking sources.
Whether it’s chlorine bleach or another form of chlorine, the goal remains singular: to maintain a water system that’s robust and upholds rigorous standards of hygiene post-disinfection, ensuring the wells remain safe for all users.
Ensuring a Safe Water System Post-Disinfection
After the essential steps of disinfecting a domestic well with shock chlorination have been carried out using the appropriate bleach formula, ensuring a safe water system post-disinfection becomes critically important. The ultimate goal of this process is to guarantee that your drinking water meets health standards and remains bacteria-free.
Follow-up testing is vital in this context as it confirms the success of contaminant removal and validates water safety and potability. It’s not just about adding bleach; it’s about confirming that the disinfection has resulted in clean water that’s suitable for consumption without health concerns.
Conducting regular water testing ensures safety assurance, which is critical if the water system serves environments demanding higher sanitation requirements, like child care facilities or establishments concerned with food safety. It’s advisable to practice patience; don’t rush to declare your water safe immediately after disinfection.
- Thorough Flushing: Run all taps, faucets, and fixtures to flush out residual chlorine and prevent exposure to harmful concentrations.
- Odor Check: Confirm the absence of a chlorine odor, indicating that the disinfection agent has been adequately flushed from the system.
- Water Quality Testing: Conduct water quality tests to verify the absence of microbial contamination and ensure that the water meets safety standards.
- Consult Health Guidelines: Adhere to local health authority guidelines to guarantee compliance with safety standards post-disinfection.
- Professional Verification: Consider involving a water treatment professional to assess the effectiveness of the disinfection process and provide additional recommendations for system safety.
- Regular Monitoring: Implement a schedule for routine water quality monitoring to promptly identify and address any issues that may arise after the disinfection process.
- Documentation: Maintain records of the disinfection process, test results, and any actions taken to ensure a safe water system, facilitating future assessments and compliance verification.
Often, residual chlorine lingers to provide a safety net against any pathogens. This chlorine can present itself through a detectable chlorine odor in your water. However, if the chlorine levels exceed the desired threshold rendering the water non-potable, de-chlorination steps may be required to restore the water’s potability.
When assessing water safety post-disinfection, checking chlorine levels through a reliable chlorine test is an immediate step. If the water retains a strong chlorine odor, extended flushing of the system might be necessary to achieve clear water. This is achieved by running water through the system until the chlorine odor is no longer perceivable and the water runs clear. The absence of the chlorine odor, coupled with a clear water appearance, can be an initial indicator of water quality but shouldn’t replace formal water testing.
To accompany water safety steps, health standards advise on running water for a while post-treatment to ensure that safe drinking water is consistently available. Bear in mind that a chlorine test should be conducted following dichlorination to confirm that the chlorine levels are compliant with daily consumption safety guidelines. *If the test reveals the presence of residual chlorine, allow the water to run more and then perform chlorine test again.
Subsequent water testing is crucial and should cover a comprehensive spectrum of analyses to ensure the water is contaminant-free and bacteria-free. This nurturing of a safe water system aims to prevent any waterborne health concerns, especially for vulnerable populations such as in child care and assures your drinking water meets or exceeds potable water standards.
Follow-Up Procedures After Disinfecting Your Well Water System
After you’ve gone through the detailed process of disinfecting your well with bleach, it’s critical to engage in proper follow-up procedures to ensure the continued safety of your drinking water. These post-disinfection steps are pivotal for maintaining your water system’s hygiene and to provide clear water assurance for all household usage. Once the initial phase of shock chlorination disinfection is complete, don’t rush to consume the water. There’s a rigorous series of testing and retesting that must take place to confirm the quality control measures have been effective.
Flush System:
- Run all taps and fixtures until the water is clear and there is no chlorine odor, ensuring the removal of residual disinfectant.
Water Testing:
- Conduct water quality tests to confirm the absence of microbial contamination and ensure that the water meets safety standards.
Consult Health Guidelines:
- Adhere to local health authority guidelines to ensure compliance with safety standards post-disinfection.
Professional Verification:
- Consider involving a water treatment professional to assess the effectiveness of the disinfection process and provide additional recommendations for system safety.
Regular Monitoring:
- Implement a schedule for routine water quality monitoring to promptly identify and address any issues that may arise after the disinfection process.
Documentation:
- Maintain records of the disinfection process, test results, and any actions taken to ensure a safe water system, facilitating future assessments and compliance verification.
These follow-up procedures are essential for maintaining the safety and quality of your well water system post-disinfection. Regular monitoring and adherence to guidelines contribute to a consistently safe water supply.
The first step in post-disinfection is to let the bleach solution work its way through every faucet, pump, and pipeline associated with your water system. It’s crucial to run water until you detect the smell of bleach at each faucet, signaling that the disinfection process is reaching all parts of your system.
After the advised contact time, typically 12-24 hours for bleach solutions, you’ll need to perform another check for chlorine residual to ensure safe levels of chlorine are present. Using a chlorine test kit, you can measure these levels directly from your faucets, as it’s important to wait until there’s no detectable chlorine before proceeding to use the water for drinking or cooking.
Next, you’ll undergo the de-chlorination steps, which typically involve running water through your system until the bleach smell dissipates. This step may require significant amounts of water to run through your system, so be prepared for this process to take some time. Once there’s no longer a bleach odor and test results from a chlorine test confirm it, you’re ready for the next stage of ensuring household safety.
It is recommended to conduct a bacterial test to assure that the disinfection was successful and the water is free from contaminants. Send off samples to a laboratory, and wait for the test results before using any water from your system. When the lab confirms that the levels of bacteria are within safe levels and meet usage guidelines, you can rest assured that your drinking water is safe again. Retesting may be necessary if initial test results don’t meet the required standards, so don’t skip this critical component of post-disinfection water quality control.
Once you’ve achieved satisfactory test results and the water runs clear, confirming that your well water system is void of any hazardous contaminants, you can safely resume using your water for all household tasks—from drinking to cooking to washing.
Remember to keep records of all your testing, retesting, and maintenance actions for future reference, as these play a vital role in managing a safe water system. Revisit your follow-up procedures periodically to ensure that your well remains a reliable source of clean, potable water. Indeed, adherence to these guidelines will contribute to the effective management of your water system, keeping you and your family safe from unwanted waterborne risks.
Conclusion:
In summary, disinfecting your well with bleach is a vital maintenance step for ensuring safe drinking water. Remember to calculate the correct amount of bleach based on your well’s size and follow the step-by-step process carefully. Safety is paramount; always wear protective gear and avoid mixing bleach with other chemicals. After the waiting period and thorough flushing of the system, retest the water to ensure all contaminants have been eliminated. By adhering to this guide, you can rest assured that your well water is clean and safe for consumption, safeguarding the health of everyone who relies on it.
![]()
References:
EPA- Drinking water Contaminants Standards and Regulations EPA
American Groundwater-Water Well Chlorination Procedure
Inspect-A-Pedia® –Definition of the Static Head Height in a Water Well
FAQ’s
Q: What is shock chlorination, and is it safe for my well?
A: Shock chlorination is the process of introducing a high concentration of chlorine to the well to eliminate harmful bacteria effectively. It is safe when performed correctly, following the right steps and precautions, including calculating the appropriate chlorine amount and ensuring thorough flushing post-treatment.
Q: Can I perform well disinfection using bleach by myself?
A: Yes, you can perform well disinfection using chlorine bleach yourself by following the comprehensive guide and safety precautions. However, if you are unsure about any part of the process, seek professional assistance to avoid mistakes and ensure successful disinfection.
Q: What steps should I take after disinfecting my well with bleach?
A: Following disinfection, allow the bleach solution to work through your system, check for chlorine residual, run water until the bleach smell dissipates, and perform bacterial tests to confirm the elimination of contaminants. Retest if necessary to ensure water meets safety guidelines before resuming consumption.
Q: How do I calculate the correct amount of bleach for shock chlorination of my well?
A: Calculate the water volume of your well, considering the well’s depth and diameter, to determine the necessary concentration of chlorine. Aim for a residual chlorine level of 50-100 ppm and ensure the solution is thoroughly mixed with the entire water system for effective disinfection.
