
Too little sand in your pool filter will create cloudy water no matter how much your filter runs. For this reason, check your filter manufacturer’s specs. Typically filters hold sand in 50 lb. increments, so you can safely expect filters to range from 100, 150, 200, and 250 lbs. The vessels must be kept filled. How to Know if Your Sand Filter is Running Low on Sand?
Indicators That Your Sand Filter is Running Low on Sand:
- Cloudy or dirty pool water
- Increased pressure readings on the filter’s pressure gauge
- Shortened backwashing cycles
- Visible signs of sand in the pool
- Decreased filter efficiency
- Algae growth
- Frequent need for backwashing
- Difficulty maintaining water clarity
Most pools benefit from a sand filter change every two to three years, but it depends on how often you use your pool and the quality of the sand. Sometimes cleaning the filter is not enough, and the sand needs to be completely replaced.
Introduction:
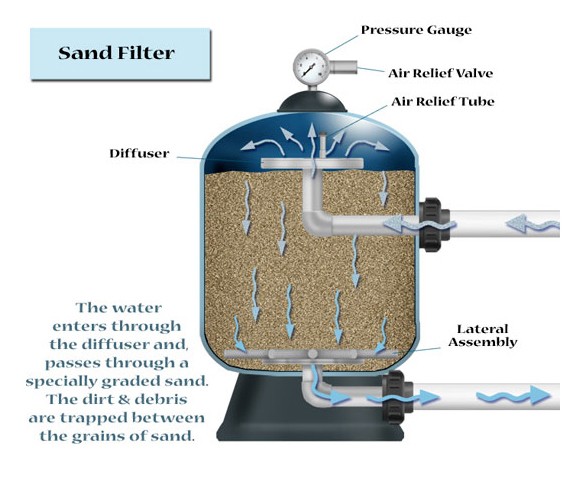
A sand filter is a type of pool filtration system that uses a bed of sand to trap and remove debris and impurities from the water, ensuring it remains clean and clear. Water is pumped through the sand, which captures particles as small as 20-40 microns, allowing clean water to return to the pool. Maintaining the proper sand levels in the filter is crucial for its efficient operation. If the sand level is too low, the filter’s ability to capture debris is compromised, leading to poor water quality and increased strain on the pump. Regularly checking and maintaining the sand level helps ensure optimal performance, prolongs the life of the filter, and keeps the pool water safe and inviting.
Signs Your Sand Filter is Running Low on Sand
When a sand filter is running low on sand, its efficiency in trapping debris diminishes significantly. Sand filters work by passing pool water through a bed of sand, where particles and impurities are caught within the tiny spaces between sand grains. With insufficient sand, the filter cannot effectively capture these particles, allowing them to pass through and return to the pool. This results in decreased filter efficiency and manifests as poor water quality, evident through consistently cloudy or dirty water despite regular filtering.

By monitoring these signs, pool owners can identify when their sand filter is running low on sand and take corrective action to restore its efficiency.
Increased Pressure Readings
Monitoring the pressure gauge on your sand filter is essential for assessing its performance and identifying potential issues. The pressure gauge, typically located on the top or side of the filter, measures the force required to push water through the sand. Under normal conditions, the gauge should display a pressure reading within the range specified by the manufacturer.
A sudden increase in pressure readings can indicate that the filter is experiencing sand depletion or clogging. When the sand level is too low, or the sand becomes clogged with debris, the system must work harder to circulate the water, leading to higher pressure. Consistently high-pressure readings suggest that the filter is struggling to operate efficiently, signaling the need for maintenance such as backwashing or adding more sand to restore proper filtration and pressure levels.
Shorter Filter Cycles
A properly functioning sand filter typically requires backwashing every few weeks to a month, depending on the pool usage and debris load. During a normal backwashing cycle, water flow is reversed to flush out trapped debris and clean the sand, maintaining the filter’s efficiency.
However, when a sand filter is running low on sand, the cycles between necessary backwashing become noticeably shorter. This is because the reduced sand volume means less surface area to trap debris, causing the filter to clog more quickly. As a result, the filter requires more frequent backwashing to clear out the accumulated particles. If you find yourself needing to backwash much more often than usual, it’s a strong indication that your sand filter has insufficient sand and needs replenishment to restore its normal filtration cycle and efficiency.
Visible Sand in the Pool
Discovering sand at the bottom of your pool is a clear indicator that there is an issue with your sand filter. This can happen for several reasons, the most common being a cracked lateral or a damaged standpipe inside the filter. These components are crucial for keeping the sand contained within the filter and preventing it from entering the pool. If they are damaged, sand can escape and settle in the pool.
To address this issue, start by turning off the pool pump and opening the filter to inspect the laterals and standpipe for any visible cracks or damage. If any components are broken, they will need to be replaced.
Additionally, check that the multiport valve is functioning correctly and is not allowing sand to bypass the filter. It’s also a good practice to verify that the sand level is adequate and that the sand itself is not too worn or degraded. Replacing damaged parts and replenishing the sand will help ensure that the filter operates correctly and prevent sand from leaking into the pool.
Physical Inspection of the Filter: Opening the Filter
During a physical inspection of the filter, safety precautions are paramount. Ensure the pump is switched off, and the power source is disconnected to prevent accidents. Carefully open the filter according to manufacturer guidelines, taking note of any signs of wear or damage. Visually inspect the sand level and condition, looking for clumps or signs of degradation. Additionally, check for any leaks or cracks in the filter components. Finally, reassemble the filter securely before restoring power to the pump.
Safety Precautions
- Turn Off the Pump: Ensure the pool pump is completely turned off to avoid any water flow while you work.
- Disconnect Power: Switch off the power supply to the pump at the circuit breaker for added safety.
- Release Pressure: Open the air relief valve on the filter to release any built-up pressure within the system.
- Wear Protective Gear: Use gloves and safety goggles to protect yourself from debris and chemicals.
Step-by-Step Guide to Opening the Filter
- Locate the Filter: Find your sand filter, typically situated near the pool pump and other filtration equipment.
- Remove the Clamp or Bolts: Depending on your filter model, use a screwdriver or wrench to remove the clamp or bolts securing the filter lid.
- Lift the Lid: Carefully lift off the filter lid. If it is heavy, seek assistance to avoid injury.
- Inspect the O-Ring: Check the O-ring or gasket for any signs of wear or damage. A faulty O-ring can cause leaks when reassembling.
- Access the Sand: Once the lid is off, you can access the sand bed inside the filter.
Checking the Sand Level
- Visual Inspection: Look inside the filter to see if the sand bed appears even and reaches the recommended height, typically two-thirds to three-quarters of the filter’s height.
- Physical Check: Use a long stick or your hand to probe the sand bed. Ensure the sand is evenly distributed and free from clumps or mud.
- Measure the Sand Depth: For an accurate measurement, use a measuring stick or tape to check the depth of the sand. Compare this to the manufacturer’s recommended sand level.
- Evaluate Sand Condition: Inspect the sand for signs of wear. Good sand should be gritty and sharp, not smooth and rounded. If the sand is clumped or feels like mud, it needs to be replaced.
Reassembling the Filter
- Replace the Lid: Carefully place the lid back on the filter, ensuring it sits evenly on the O-ring or gasket.
- Secure the Clamp or Bolts: Tighten the clamp or bolts to secure the lid, ensuring a tight seal to prevent leaks.
- Close the Air Relief Valve: Make sure the air relief valve is closed to avoid water escaping when the pump is turned back on.
- Restore Power: Turn the power back on at the circuit breaker.
- Restart the Pump: Turn on the pool pump and check for any leaks around the filter lid.
By following these steps, you can safely and effectively inspect and maintain the sand level in your filter, ensuring optimal performance and clean pool water.
Maintenance Tips to Prevent Low Sand Issues
To prevent low sand issues in your sand filter, it’s essential to prioritize regular maintenance. Schedule routine inspections to monitor sand levels and overall filter condition, ensuring optimal performance. Proper backwashing techniques are crucial to avoid losing excessive sand, so follow manufacturer instructions carefully.
Additionally, adhere to recommended sand replacement intervals, typically every 3-5 years, to maintain effective filtration. By staying proactive with maintenance, you can prolong the life of your sand filter and enjoy consistently clear and safe pool water.

Regular Inspections
To maintain the optimal performance of your sand filter, schedule routine inspections to monitor sand levels and the overall condition of the filter. Check the sand level visually and physically at least once a season, or more frequently if your pool experiences heavy use. Regular inspections help identify potential issues early, allowing for timely intervention before significant problems arise.
Proper Backwashing Techniques
Correct backwashing procedures are crucial to avoid losing excessive sand from the filter. Follow the manufacturer’s instructions carefully: typically, you should backwash the filter when the pressure gauge indicates a 7-10 psi increase over the clean operating pressure.
Ensure the pump is turned off before switching to the backwash setting. Run the backwash until the water in the sight glass appears clear, usually for about 2-3 minutes, then rinse for about 30 seconds before returning to the filter setting. Proper backwashing helps maintain the sand’s effectiveness and prevents unnecessary loss.
Conclusion:
In conclusion, ensuring the correct sand level in your sand filter is paramount for maintaining efficient pool filtration. By adhering to a routine maintenance schedule that includes regular inspections, proper backwashing techniques, and timely sand replacement, you can guarantee clean and safe swimming water for yourself and your family. Vigilance in monitoring sand levels and promptly addressing any issues that arise will not only optimize the performance of your filter but also extend its lifespan, ultimately saving you time and money in the long run. With these proactive measures in place, you can enjoy crystal-clear pool water all season long, providing a refreshing oasis for relaxation and enjoyment.
![]()
References:
Pools of Fun-It’s Time to Change the Filter Sand
FAQ’s
- How often should I check the sand level in my filter? It’s recommended to check the sand level at least once a season, or more frequently if your pool gets heavy use.
- How do I measure the sand depth in the filter? Use a measuring tape or stick to gauge the depth of the sand bed, aiming for the recommended level specified by the manufacturer.
- What should I do if I find sand in my pool? This could indicate a problem with your filter, such as a cracked lateral or damaged standpipe. Inspect the filter and repair or replace any damaged components.
- How often should I backwash my sand filter? Backwash the filter when the pressure gauge indicates a 7-10 psi increase over the clean operating pressure, typically every few weeks to a month.
- When should I replace the sand in my filter? It’s generally recommended to replace the sand every 3-5 years, depending on usage and water conditions.
- Why is my pool water still cloudy after filtering? Cloudy water could indicate a problem with your filter, such as low sand levels or a clogged filter. Check the sand level and perform backwashing if necessary.
- How do I prevent sand loss during backwashing? Follow proper backwashing techniques recommended by the manufacturer, and avoid excessively long backwashing cycles.
- Can I use any type of sand for my filter? No, it’s essential to use specifically graded pool filter sand, as other types of sand may not provide adequate filtration.
